Showing posts with label snack. Show all posts

Wednesday, July 29, 2015

Summer Shenanigans: Food

Since I've been at home and my sister doesn't need lunch to bring to school the next  day, my mom has felt much more adventurous with her cooking. I've had so much fun helping her make some Taiwanese favorites that we haven't had since our trip last summer. Here is some of the delicious food we've made!

Cream-filled rolls

I haven't seen these before, anywhere, but my mom found the recipe in her five-inch recipe binder. Looks like she cut it out of a magazine almost twenty years ago. These rolls are bread-like and can be reheated to out-of-the-oven goodness in the toaster oven. The filling is supposed to be a cream made of margarine, sugar, flour, and evaporated milk; but ours ended up more as a powder (for all three times we tried the recipe). It made them a little harder to roll up, but they were delicious all the same. This is the result of our first go; you can see they're slightly overcooked. These took up a lot of time; the dough had to rise (and for some reason our yeast always takes forever) and the assembly of 36 to 48 rolls is no easy task. I had so much fun with these, though. We made a little assembly line--my mom rolled out the dough, I filled it and rolled it up. The most interesting part of this recipe was the mozzarella cheese in the dough! We also tried steaming some extra dough one time, and it was delicious.

Buns

After we made the rolls, there was a lot of powder left. It reminded me of the cream in Chinese custard buns, so we decided to make buns! We filled some with the leftover powder for dessert; the rest were filled with pork and chives from our garden. I learned how to wrap up a bun, and I have to say I'm pretty happy with the results. The only problem I had was that no matter what I did, there was always a small hole at the top that I'd have to pinch closed. These were delicious, and the work involved with kneading the dough was well worth it. They rivaled the taste, though certainly not the convenience, of their frozen counterparts in the States. However, I think the fresh buns sold from stands in Taiwan probably edged out ours.

Beef and Scallion Pan-Fried Cakes


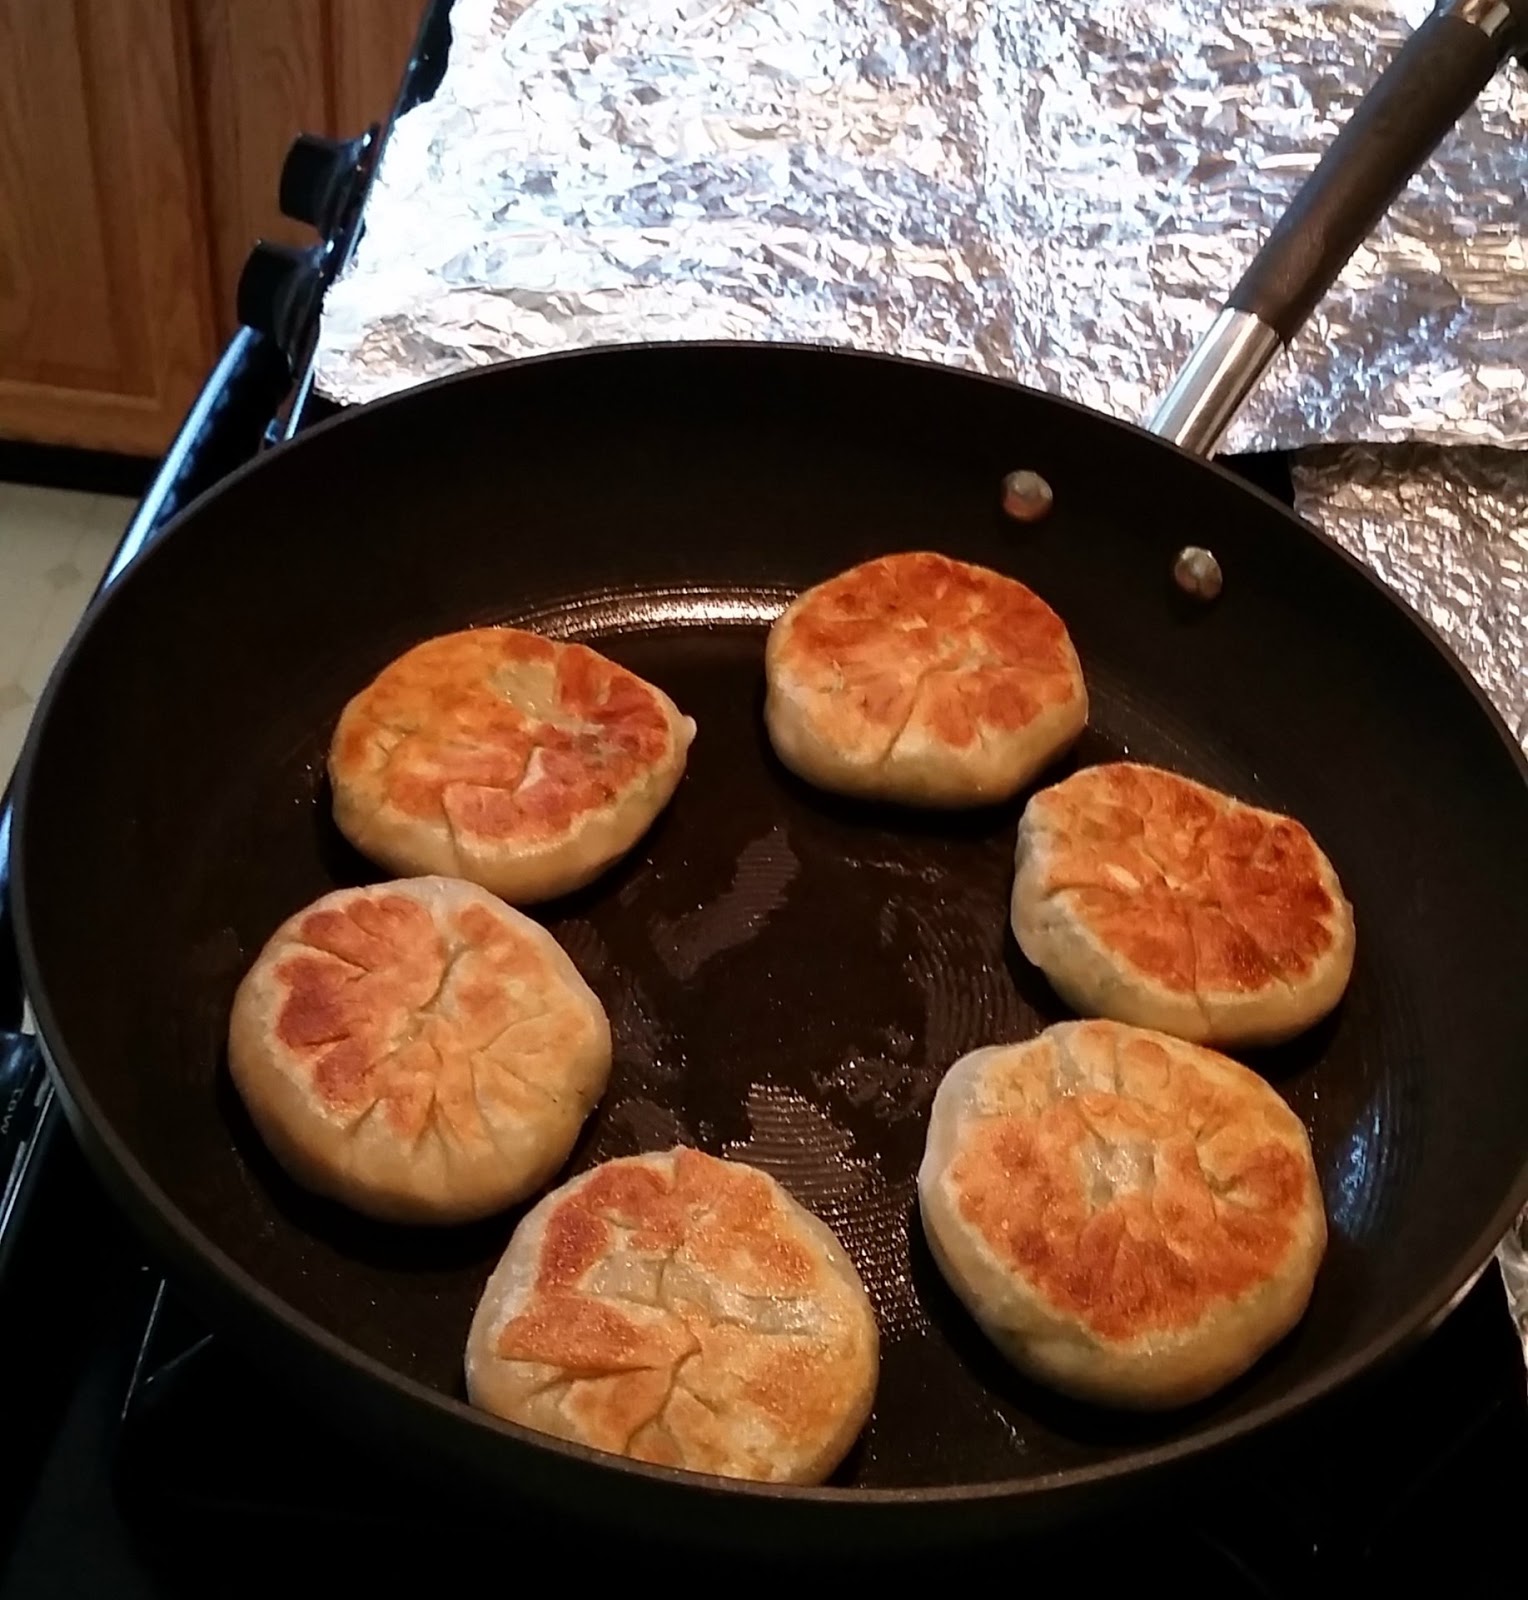
My, those pictures make me hungry. I've only had these pan-fried cakes in Taiwan, and let me tell you, those things are heaven. Ground beef infused with the fragrance of scallion is wrapped in a dough that's fried until crispy, then the whole thing is dunked in vinegar and soy sauce for a whole lot of delicious. The first time we made these we didn't have beef on hand, so we went with pork and Chinese chives from the garden. Chinese chives have flat blades and are a lot larger than the herb-like chives; they also have a much more pungent taste (like garlic and onions). My mom always planned our chive meals to be dinners after which none of us would go out. If something came up, we'd have to chew gum to get the smell out of our mouths. Neither my mom or I were very sure how to wrap these; I ended up doing a bun-like shape and then squashing the opening closed and down. Whatever works, right? Having these while States-side was a treat in and of itself, but our cake was a little tough. But when it was fresh out of the pan and crispy, there was nothing better. Downsides: burning my tongue on the delicious hot juice that had gathered inside.

Bubbles

You know, like in bubble tea? That's what I'm talking about here. Check out this post to see more pictures and for a brief recipe for this sweet and healthy (I think... I hope) treat.

Different kinds of sweet potato (and other starchy vegetables) provide endless combinations!


Vegetable "Snake"

This is a recipe from my grandmother. It's dough filled with a mixture of Chinese chives, egg, and tofu seasoned with soy sauce and sesame oil, then steamed. The name comes from the shape--the long, skinny rolls (apparently) resemble a snake. These are rather time-consuming because the egg and tofu need to be cooked first, chopped into tiny pieces, and cooled before the filling can be made. The assembly time doesn't take a ton of time because each roll is so large, but kneading and rolling out the dough is not something we do often.

Tuesday, July 28, 2015

地瓜圆: Sweet Potato "Bubbles"

Three kinds of sweet potato
 You know the chewy texture of the tapioca bubbles in bubble tea? In Chinese, it's described as "Q." I titled this post "Sweet Potato 'Bubbles'" because 地瓜圆 (di gua yuan) have that kind of texture. They also have all the sweet deliciousness of a sweet potato. They're made from three ingredients: sweet potatoes, tapioca flour, and water. Tapioca flour can be found in some supermarkets (I've seen it at ShopRite) and Asian supermarkets.

To make these delicious bubbles, cook, peel, and mash the sweet potatoes (microwave, oven, steam, your choice), then combine in a 10:3 ratio by weight with tapioca flour. Add a tablespoonful of boiling water, and use your hands to knead the mixture into a dough. Depending on the sweet potato, you may need to add more flour or more water. The dough should be pretty easy to mold.


For the following steps, I like to work on a cutting board protected with a piece of plastic wrap. Break off pieces of dough and roll them into cylinders that are about a half-inch in diameter. Use a knife to chop the cylinders into pieces about 3/4 of an inch long. (The size really doesn't matter).
Shaved ice with bubbles and mung bean

At this point, you can freeze your sweet potato bubbles. From room temperature or the freezer, the following cooking process is the same. Boil some water, then gently drop the bubbles into the water with a spoon, stirring to prevent them from sticking to the pot. Keep the water at a simmer and stir occasionally. When the bubbles float to the surface of the water, they should be ready. Taste one just to make sure--it shouldn't taste floury.

The bubbles can be eaten hot or cold--once cooked, they can cool to room temperature without getting mushy, but I wouldn't put them in the refrigerator. I like to eat these with hot water with brown sugar dissolved in it. These are also commonly found as a topping for Taiwanese shaved ice (baobing).


Taro bubbles
You're not limited to sweet potatoes for this recipe. Also note that sweet potatoes tend to need a lot more tapioca flour. Taro, a potato-like root vegetable that's featured in both savory dishes and desserts, is another common type of bubble. I've also tried pumpkin. There are so many possibilities--so get some tapioca flour and try this out!

Monday, January 12, 2015

Peanut Butter Honey Rice Krispies Treats

As the first weekend of the spring semester rolled around, the weather outside was frightful. Below freezing. No way I was going to leave the building unless I had to. Instead, I made food. Lots of food. I made some cookie truffles--Oreo, Nutter Butter and KitKat and Crunch and Peanut M&M and Whopper, Lorna Doone and banana and vanilla pudding--to empty the food cabinet a bit. My floor devoured them.

I also made peanut butter honey bars to have on hand for breakfast when my roommate is asleep. Except I ate a quarter of the pan when they were done, snacked on them, and had them for breakfast even though she wasn't here. That's how delicious they were. Fortunately, I have enough to last me the three mornings I get up earlier than her this week. Unfortunately, I don't have any for next week, and I'm not going to be here over the holiday weekend so I can't make more.

I found a bunch of variations on Pinterest and molded them into this recipe. The honey taste was too strong for me, though, so I'm going to try increasing the peanut butter-to-honey ratio next time (and trust me, there will be a next time!). Here are some other versions (note that they all have different ratios of peanut butter and honey):

What I did, but with Trader Joe's O's
Made with oats
Or how about with Raisin Bran?


Here's what I ended up doing.

PEANUT BUTTER HONEY RICE KRISPIES TREATS

Ingredients:
½ cup peanut butter
½ cup honey
4 cups Rice Krispies cereal (or 3 cups of any other cereal or oats)


Directions:

1. Line a pan with foil or parchment paper, or spray it with cooking spray.

2. Combine peanut butter and honey in a microwave-safe bowl. (I used a 1/4-cup measure because my 1/2-cup is in my tub of oats, which is why there are two blobs of peanut butter.)
3. Microwave peanut butter and honey on HIGH for 1 minute; stir well.

4. Add cereal and stir well.


6. Press into the lined pan.

7. Cool, then cut into bars.


I've been eating these straight from the freezer, and I love the consistency. However, I'm pretty sure our freezer is a little less cold than most. According to the other posts I've read, these can get a little gooey at room temperature, but try and see what works for you!

I can't wait for breakfast tomorrow. Can you guess why? (Hint: I'm getting up earlier than my roomie.)


Friday, December 12, 2014

Graham Cracker Cakes

Finals are over! Whoooo! I celebrated by making a cake. In my dorm room. Which has no oven. That's right. Pinterest introduced me to the concept of graham cracker cakes, which actually don't even require the microwave. Basically, you alternate layers of graham crackers and pudding/cream cheese/Cool Whip. Then you put your "cake" in the refrigerator for 3 to 4 hours so the graham crackers soften. And then there you have it--a cake! It's actually delicious. I used chocolate pudding today, but anything goes! Jelly would probably taste good, too... I don't even know if this counts as cooking, but I'll label it as such anyway :)

Wednesday, December 10, 2014

Banana Pudding Sandwiches

Two finals down, two to go! I celebrated the halfway point by coming back from Final Number 2 and making food. Haven't looked at a textbook yet. I'll probably regret it later, but that's okay. Because I just made the most delicious snack yet (if I do say so myself)... banana pudding sandwiches! Super easy, and made from three ingredients found in Quick Zone: bananas, vanilla pudding, and Nilla wafers (or graham crackers). The microwave's not even necessary! (Though I did use it to bring out the banana flavor.) So here they are!


BANANA PUDDING SANDWICHES
Makes 40-50 sandwiches.

Ingredients:
1 medium ripe banana
3 vanilla pudding cups (like the Snack Pack kind)
1 box Nilla wafers (11 ounces, about 80 wafers)
(Feel free to adjust the banana-to-pudding ratio to your taste!)


Directions:
Banana pudding
1. Peel and chop the banana into a microwave-safe bowl.

2. Add the pudding.

3. Microwave on high for about 1 minute.
This step is optional, but I love how this brings out the banana flavor

4. Mash the banana chunks and stir well.

5. Place pudding in refrigerator or freezer for a few minutes to cool and set.


Making sandwiches

6. Lay out half of the Nilla wafers flat-side up, then dollop pudding onto each wafer.

7. Place a wafer flat-side down on top of the pudding to make sandwiches.

8. Place sandwiches in refrigerator or freezer for a few minutes to cool and set.

9. Serve right out of the fridge. Enjoy!

*I was just short of Nilla crackers, so I had to supplement with a couple graham crackers. Use whatever you have on hand! I think these would go great with Ritz, too...

My room is now filled with the heavenly smell of banana. Natural banana. Yum!