Friday, July 19, 2013

Tutorial: Despicable Me Minion: Part 1: Torso

I love Despicable Me minions. You could say I'm a little obsessed with them--I bought McDonald's Happy Meals because they're giving out minion toys. I usually avoid McDonald's like the plague. That's how much I love minions. They are so adorable, and just looking at them makes anybody smile. So, they're my newest knitting project. There weren't many knitting patterns, and I didn't really like the ones I found, so I'm using All About Ami's tumblr as inspiration. Hers is crocheted, though... so here's my adapted knitting pattern!

Finished size: about 12" long (life-size!)
Yarn: Red Heart Super Saver bright yellow and black (for hair)
U.S. Size #7 DPNs and/or circular needles
Gauge: 19.5 stitches x 26 rows = 4" x 4" in stockinette
white glue
polyester fiber-fill

CO 8 using an invisible cast-on (I used the disappearing loop cast-on)
Round 1: K (8)
2: KFB all around (16)
3: K (16)
4: *KFB, K1 around (24)
5: K (24)
6: *KFB, K2 around (32)
7: K (32)
8: *KFB, K3 around (40)
9: K (40)
10: *KFB, K4 around (48)
11: K (48)
12: *KFB, K5 around (56)
13: K (56)
14: *KFB, K7 around (63)
15: K (63)
16: *KFB, K8 around (70)
17: K (70)
18: *KFB, K9 around (77)
19: K (77)
20: *KFB, K10 around (84)
21: K (84)
22: *KFB, K13 around (90)
23: K (90)
24: *KFB, K44 around (92)
25: *KFB, K45 around (94)
26: KFB, K93 (95)
27: KFB, K94 (96)
28-80: K (96) (feel free to add or subtract a few rows to taste!)

Before you start closing up the minion, add some hair...
Cut lengths of black yarn and tie a knot at the ends. Use your fingers to rub white glue along the length of the yarn so it stiffens. When dry, poke the yarn through the top of the minion, then trim the hair to the desired length, if necessary.
Also, it's a good time to start stuffing!

81: ssk, K94 (95)
82: ssk, K93 (94)
83: *ssk, K45 around (92)
84: *ssk, K44 around (90)
85: K (90)
86: *ssk, K13 around (84)
87: K (84)
88: *ssk, K10 around (77)
89: K (77)
90: *ssk, K9 around (70)
91: K (70)
92: *ssk, K8 around (63)
93: K (63)
94: *ssk, K7 around (56)
95: K (56)
96: *ssk, K5 around (48)
97: K (48)
98: *ssk, K4 around (40)
99: K (40)
100: *ssk, K3 around (32)
101: K (32)
102: *ssk, K2 around (24)
103: K (24)
104: *ssk, K1 around (16)
105: K (16) (and finish up stuffing)
106: ssk all around (8)
107: K (8)
Cut yarn and pull through remaining loops; weave in ends.

See Part 2 for the arms and hands!

The pattern is for personal use only. The finished item may not be sold for profit. Please acknowledge the author. Thank you!

Mesh Yarns: Who's Who

So after my initial foray into the realm of mesh yarns, I returned to Michael's with my mom and sister so they could choose colors for more ruffle scarves. And I have now knit with three brands of mesh yarn. There's Red Heart Sashay, Patons Pirouette, and Premier Starbella Flash. How are they different? Let's see...

Length: A skein of Sashay is 30 yards long, Starbella 33, and Pirouette 17. However, since the holes of Pirouette are wider, you can cast on five stitches for a scarf. Five stitches of Pirouette is about the same length as six of Sashay or eight of Starbella.

Mesh: As I've already noted, Pirouette holes are wider, so with the every-two-big-space rule, the spacing between each row is also wider. This makes the ruffles less dense--each starts where the previous one ends, unlike Sashay, where the ruffles are more "stacked." Also, Sashay's mesh is made of thinner string than Pirouette and Starbella, so while Sashay is knit with the top two strands, I feel comfortable knitting Pirouette and Starbella with only the top strand. Starbella's holes are wide enough to use one hole per stitch.

Price: At Michael's, Sashay is $4.99 a skein, Pirouette $5.99, and Starbella $6.99 (which is why I originally chose Sashay ;) ). But each brand offers many different colors and textures--Pirouette's edge, for example, is cotton-ball soft, while Starbella and Sashay have a metallic edge.

Tuesday, July 2, 2013

Literary Analyses

Warning: this is a rant.

I hate highly dislike reading books in English class. Because invariably, the teacher always makes us look for symbolism and foreshadowing and the HIDDEN MEANING of EVERYTHING. Interestingly enough, the hidden meanings are exactly the same from teacher to teacher to Sparknotes. And this is not a dig on Sparknotes, but please read this sentence: "Since Milkman is able to conceal his leg, he believes that he can also hide his emotional shortcomings." This is from the Sparknotes on Song of Solomon (by Toni Morrison--summer reading, woohoo).

Who decides what's right and what's wrong? That Milkman example I can kinda buy, though unwillingly. But half the time I feel like literary critics just want to sound smart. And honestly, the very existence of Sparknotes is PROOF that there are STRICTLY STANDARDIZED INTERPRETATIONS OF LITERATURE. Please.

This past year in English class, I remember reading about symbols. The passage said something along the lines of (and this is very much paraphrased), "Symbols should be obvious. A reader should not impose symbolism. It is better to miss symbols than to assign a meaning to an inordinate number of objects." Thank you, English textbook -_-

I think books should be for pleasure. If people want their stories to have moral values, they should be obvious enough for any reader to pick up.

And what's the point of symbols anyway? Why does it matter what First Corinthians and Magdalene called Lena's artificial roses symbolize? They play their part in story, that's all. Of what importance is the fake love, other than what can already be seen by Milkman's behavior?

And this is not even a rant about Song of Solomon--it's just on my mind because I've been reading it for school.

Literature is an art. And art is extremely subjective. I mean, this is pretty much like the artsy people who stand in front of a canvas of blobs and streaks and say, "That green dot represents peace, but its small size and position in the corner mean that it's relatively unfounded" when there's a wide green slash through the center of the canvas.

But then there are books like Orwell's Animal Farm, where, if you know your history, there's not way you can miss the parallelism. I hated could not stand the book. Do you really not have anything else to write about? You have to just take history and play it out on a farm? Furthermore, pigs are my favorite animals. A complete non sequitur, but still. (However, I very much enjoyed 1984.)

Ahem. And now I am done.

Tutorial: T-Shirt Upcycle Project: Woven Potholder

So I've been cutting up lots of shirts for my t-shirt quilt (which is still a work-in-progress--I just have some blocks of interfaced shirts), and so I have lots of shirt left over. I used some for Christmas presents--specifically, potholders. I made two types: a woven one, and a knotted one. Both are nice and thick and perfect for protecting tables from heat! Even better, they require minimal sewing.

I'll devote this post to the woven potholder, which looks something like this:

 
 That one is currently in California, in the possession of one very lucky aunt ;) But no worries--I started another one in the winter that I just dug up today and added to:


And here's how I did it (I made mine with five strands, so these instructions will be for five, but this'll work with however many you wish.) :
1. Get five strands of t-yarn (see a tutorial here)
*For mine, I took the hem of a t-shirt, ripped out the seam, and cut it lengthwise. That provided me with more than enough t-yarn for one potholder.
2. Take a needle and thread (sad face) and stitch the five strands together.
3. Start weaving... take the right-most strand and go all the way to the left. The mantra is "over under over under." Then take the new right-most strand and go over under over under (the last under is the strand you just used to weave).
4. After the woven section is long enough to circle up flat (about ten to twelve stitches), start the magic that takes the place of needle and thread...
5. Before you weave with the next strand, find the loop from your first woven stitch (I'm pointing to it here, but I'm on the second time around. Same idea, though...) ...

6. ...and pull the next strand up through the loop...
7. ...then continue weaving.
(my thumb is not bleeding--I was experimenting with a bottle of nail polish and intended to wipe it off before it dried, but, well, it dried. I got it off later in the day :) )
 
8. Repeat steps 5-7 as you continue weaving. I put anywhere from one to three strands into a single loop before I move one--it depends how far the weave has gotten.
 
 
As you work, make sure to tug the strands tight and ensure that the pot holder is staying flat. If the sides start to curl up, loosen the edges a little.
 
When you reach the desired size, start weaving from the left to the right to taper the end circularly, then stitch the strands together and snip off any excess. You don't have to taper, but I don't like seeing an obvious break-off point.
 
So that's it! It's very easy once you get the feel of it. I hope you enjoy! (You can also make smaller versions as coasters, but considering the season, potholders might be of more use :) )

Red Heart Sashay Frilly Scarf

So I was wandering around Michael's the other day, and came across a sample of Red Heart Sashay hanging oh-so-invitingly on the shelf. I was hooked. I've never seen a mesh-style yarn before. And I absolutely could not help myself, so I bought a skein. That's enough for a scarf.

 (How can you not give in to curiosity when this is hanging in Michael's?)

 
I cast on six stitches (I say "cast on," but I mean "poked needle through six holes"--absolutely great!) and started knitting! The trick is to only use the top two strands of the mesh, not the whole thing. And you just pull the rest out as you go. Since it was only six stitches wide and one skein long, it was a very quick project--not nearly enough time to get bored of just plain knitting. Also, the mesh part kept me enthralled the whole time.
What's even better is that there's barely any finishing--the pattern directions call for needle and thread, but I just knotted the ends and hid the knots in the ruffles. And voila, after a day of knitting, I have a scarf!


Oddly, mine is pretty short--a lot less than the five feet I should've gotten from one skein. Maybe I knit too tightly? But it's okay because it's long enough for my taste. Also, my ruffles seem to be stacked very closely on top of each other--probably the same problem. I've found that I can pull each ruffle in opposite directions, though, which makes the whole thing look a lot poofier and nicer.

I'm not really into frills or decorative scarves... but I must find an outfit and occasion for this!

Update: I re-knit this scarf while consciously telling myself to stay loose, and the results were so much better! By loose, I mean extremely loose--knit with every other big hole. The yarn calls for US size 9 needles, but you could probably go 1.5 times thicker. That's how loose I'm talking. But why I like it: 1.) The scarf is longer. 2.) The ruffles look more like ruffles and less like circles stacked one atop of another, and the tugging in opposite directions is unnecessary. So much better--KNIT LOOSELY!!!

Saturday, April 27, 2013

scrap yarn pictures

Wow it's been so long since I've written...
Well, I've finally gotten around to squaring off my scrap yarn patch and taking some pictures...
The pink patch was made by picking up stitches along the blue and yellow patches.

The white, blue, and yellow patches were knit after the pink one, and I just inserted my needle into the pink patch before knitting the first stitch (see previous post for clarification). As you can see, the join is quite neat.

The back, full of knots--I'll have to fix that up

And of course, the front!
Any more scrap yarn I find/get is gonna end up here!


Thursday, February 21, 2013

Tutorial: Glittens--what eventually happened

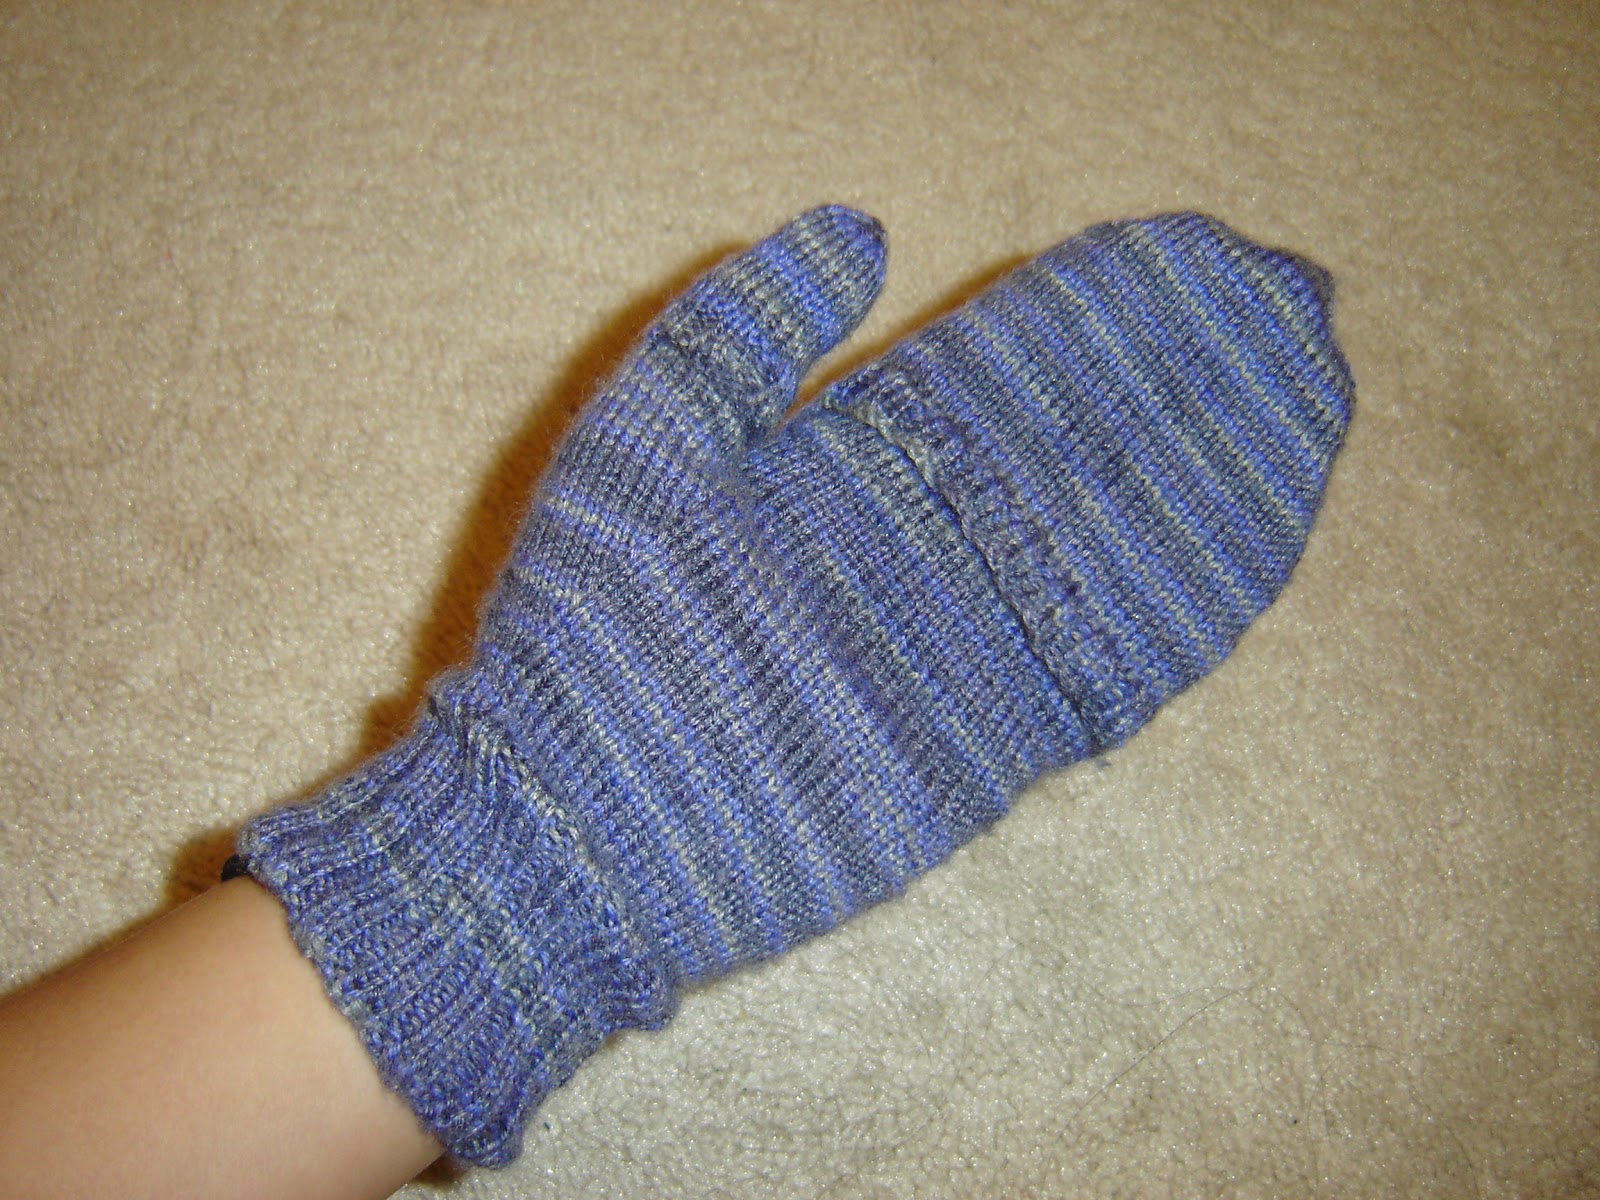
So those glittens I was talking about... here's my pattern!


Deborah Norville Serenity sock yarn
US size 1 needles

m1: make a stitch by picking up the loop between the stitch you have just knitted and the next one, place it on the left hand needle and knit into the back of it

I used cable cast-on for fingers; knit cast-on for thumb/mitten flaps

LEFT HAND
Cast on 60 sts (on a size 5 needle) and join in round
Switch to size 1 needles
Rib 30 rounds
Stockinette 6 rounds

Thumb Gusset:
K27, place marker, m1, K1, m1, place marker, K32
K 2 rounds
K27, m1, K3, m1, K32
K 2 rounds
Continue increasing as such until there are 19 sts between the markers.
K 5 rounds (so the 2 that usually come after the increase rounds, plus three more)
K27, slip the next 19 sts on hold, K32 (59 sts)
K 15 rounds

Pinkie:
K7, slip all but the last 7 sts on hold, CO 3, K7 (17 sts)
K 11 rounds
Cast off (with a size 5 needle)

Upper Hand:
Rejoin yarn at base and pick up the 3 cast-on sts (48 sts)
K all sts on hold
K 5 rounds

Ring Finger:
K10, slip all but the last 6 sts on hold, CO 3, K6 (19 sts)
K 17 rounds
Cast off (with a size 5 needle)

Middle Finger:
Rejoin yarn at base and pick up the 3 cast-on sts
K7, slip all but the last 7 sts on hold, CO 3, K7 (20 sts)
K 23 rounds
Cast off (with a size 5 needle)

Pointer Finger:
Rejoin yarn at base and pick up the 3 cast-on sts
K all sts on hold (18 sts)
K 18 rounds
Cast off (with a size 5 needle)

Thumb:
Pick up 4 sts, knit sts on hold (23 sts)
K 10 rounds
Cast off (with a size 5 needle)

Mitten Flap:
Pick up 30 sts on back of glove, approximately 10 rows down from the base of the little finger (about where base knuckles of fingers will be). Do this by slipping a needle into the right side of each stitch, EXCEPT for the first and last stitch where I picked up both sides of the stitch. Work towards the thumb and knit all these sts, remembering to treat the first and last stitch as only 1 stitch each. Then cast on 34 sts and join into a round. (64 sts)
K30, K2P2 rib next 34 sts, for 6 rounds
K 26 rounds
k1, ssk, k24, k2tog, k1; k1, ssk, k28, k2tog, k1 (60 sts)
k1, ssk, k22, k2tog, k1; k1, ssk, k26, k2tog, k1 (56 sts)
Continue decreasing like this till you have completed:
k1, ssk, k2tog, k1; k1, ssk, k4, k2tog, k1 (12 sts)
k1, ssk, k1; k1, ssk, k2, k2tog, k1 (9 sts)
k3; k1, ssk, k2tog, k1 (7 sts)
k3; k1, ssk, k1 (6 sts)
Cut and pull yarn through remaining sts

Thumb Flap:
Pick up 12 sts on back of glove, approximately 8 rows down from the top of the thumb (same way as for mitten flap). Work towards the thumb and knit all these sts, remembering to treat the first and last stitch as only 1 stitch each. Then cast on 12 sts and join into a round. (24 sts)
K12, K1, K2P2 rib, end K1 for 6 rounds
K 15 rounds
k2tog all around (12 sts)
k2tog all around (6 sts)
k2tog all around (3 sts)
Cut and pull yarn through remaining sts.

Weave in ends.

RIGHT HAND
Same as left hand except for the following:

Thumb Gusset:
K32, place marker, m1, K1, m1, place marker, K27
K 2 rounds
K32, m1, K3, m1, K27
K 2 rounds
Continue increasing as such until there are 19 sts between the markers.
K 5 rounds (so the 2 that usually come after the increase rounds, plus three more)
K32, slip the next 19 sts on hold, K27 (59 sts)
K 15 rounds

Ring Finger:
K6, slip all but the last 10 sts on hold, CO 3, K10 (19 sts)
K 17 rounds
Cast off (with a size 5 needle)

Mitten Flap:
Work towards the pinkie.

Thumb Flap:
Work towards the pinkie.

Note: I would add maybe 5 more rounds to the mitten flaps before I started to decrease next time. Also, maybe knit a couple more rows at the end of the thumb gusset (it was a tight fit for me, and my hands are relatively small.)