Friday, December 12, 2014
Graham Cracker Cakes
Finals are over! Whoooo! I celebrated by making a cake. In my dorm room. Which has no oven. That's right. Pinterest introduced me to the concept of graham cracker cakes, which actually don't even require the microwave. Basically, you alternate layers of graham crackers and pudding/cream cheese/Cool Whip. Then you put your "cake" in the refrigerator for 3 to 4 hours so the graham crackers soften. And then there you have it--a cake! It's actually delicious. I used chocolate pudding today, but anything goes! Jelly would probably taste good, too... I don't even know if this counts as cooking, but I'll label it as such anyway :)
Wednesday, December 10, 2014
Banana Pudding Sandwiches
Two finals down, two to go! I celebrated the halfway point by coming back from Final Number 2 and making food. Haven't looked at a textbook yet. I'll probably regret it later, but that's okay. Because I just made the most delicious snack yet (if I do say so myself)... banana pudding sandwiches! Super easy, and made from three ingredients found in Quick Zone: bananas, vanilla pudding, and Nilla wafers (or graham crackers). The microwave's not even necessary! (Though I did use it to bring out the banana flavor.) So here they are!

BANANA PUDDING SANDWICHES
Makes 40-50 sandwiches.
Ingredients:
1 medium ripe banana
3 vanilla pudding cups (like the Snack Pack kind)
1 box Nilla wafers (11 ounces, about 80 wafers)
(Feel free to adjust the banana-to-pudding ratio to your taste!)

Directions:
1. Peel and chop the banana into a microwave-safe bowl.
2. Add the pudding.
3. Microwave on high for about 1 minute.
This step is optional, but I love how this brings out the banana flavor
4. Mash the banana chunks and stir well.
5. Place pudding in refrigerator or freezer for a few minutes to cool and set.
6. Lay out half of the Nilla wafers flat-side up, then dollop pudding onto each wafer.
7. Place a wafer flat-side down on top of the pudding to make sandwiches.
8. Place sandwiches in refrigerator or freezer for a few minutes to cool and set.
9. Serve right out of the fridge. Enjoy!
*I was just short of Nilla crackers, so I had to supplement with a couple graham crackers. Use whatever you have on hand! I think these would go great with Ritz, too...
My room is now filled with the heavenly smell of banana. Natural banana. Yum!
BANANA PUDDING SANDWICHES
Makes 40-50 sandwiches.
Ingredients:
1 medium ripe banana
3 vanilla pudding cups (like the Snack Pack kind)
1 box Nilla wafers (11 ounces, about 80 wafers)
(Feel free to adjust the banana-to-pudding ratio to your taste!)
Directions:
 |
| Banana pudding |
2. Add the pudding.
3. Microwave on high for about 1 minute.
This step is optional, but I love how this brings out the banana flavor
4. Mash the banana chunks and stir well.
5. Place pudding in refrigerator or freezer for a few minutes to cool and set.
 |
| Making sandwiches |
6. Lay out half of the Nilla wafers flat-side up, then dollop pudding onto each wafer.
7. Place a wafer flat-side down on top of the pudding to make sandwiches.
8. Place sandwiches in refrigerator or freezer for a few minutes to cool and set.
9. Serve right out of the fridge. Enjoy!
*I was just short of Nilla crackers, so I had to supplement with a couple graham crackers. Use whatever you have on hand! I think these would go great with Ritz, too...
My room is now filled with the heavenly smell of banana. Natural banana. Yum!
Improvements on Betty Crocker Warm Delights: Hot Fudge Brownie
Weeks ago, in the Quick Zone, I came across a shelf of Betty Crocker Warm Delights bowls. Just for kicks, I bought a hot fudge brownie one. It sat in the cabinet until this afternoon, when I finally decided to do something with it. Because I was going to leave it in the hall for my floor-mates, I didn't want to just make the brownie, though. So this is what happened:
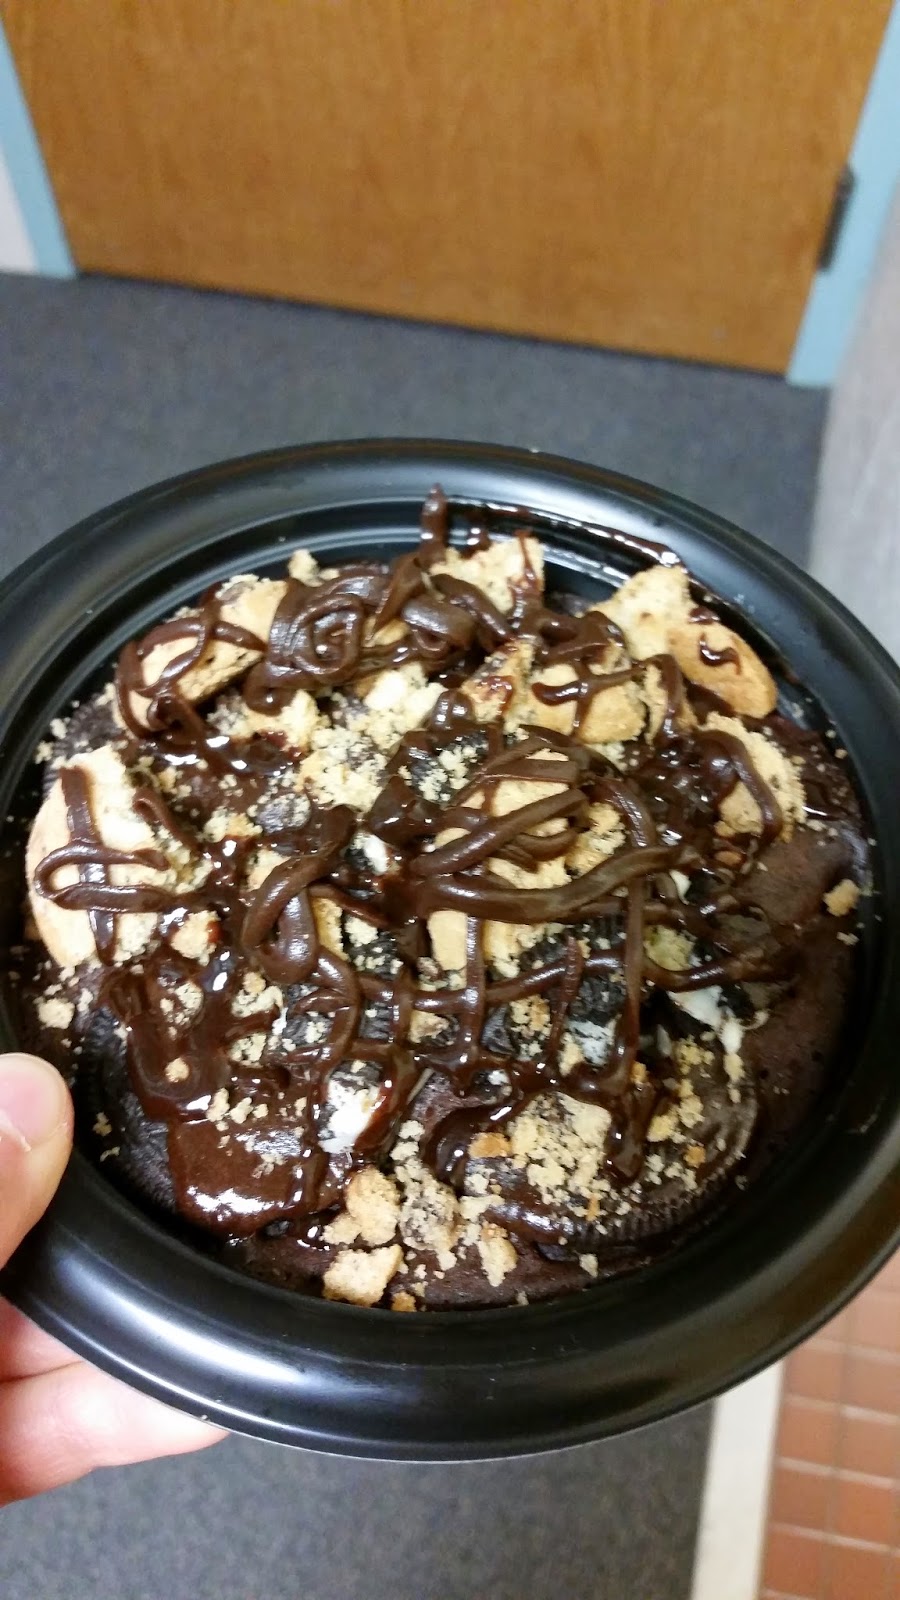
 |
| Betty Crocker Warm Delights--even better! |
I was inspired by slutty brownies--you know, layer of cookie dough, layer of Oreos, layer of brownie batter, baked to perfection? Well I had mini Chips Ahoy!, Oreos, and brownie mix. So why not make slutty Warm Delights?
Here's what I did:
BETTY CROCKER WARM DELIGHTS: SLUTTY HOT FUDGE BROWNIE
Ingredients:
1 package Betty Crocker Warm Delights, Hot Fudge Brownie*
Water (for the brownie)
10 mini Chips Ahoy! (or any chocolate chip cookie... or any cookie, really...)
6 Oreos
Directions:
1. In a separate bowl, prepare brownie mix according to package directions. (Mix 1 tablespoon and 1 teaspoon of water with brownie mix.) Or you could use the bowl provided, if you're not too concerned with a chocolate chip cookie bottom :)
2. Place 7 Chips Ahoy! cookies in the bottom of the Warm Delights bowl.
3. Place 5 Oreos on top of the Chips Ahoy! cookies.
4. Pour brownie batter into bowl. Use a spoon to spread it around evenly and make sure it gets into the gaps between the cookies.
5. Cook brownie according to package directions (Microwave on high for about 45 seconds).
6. Remove brownie from microwave and top with remaining cookies, crushed, and hot fudge topping.
7. If you don't plan to cut the brownie, let it sit for 5 minutes (at least, that's what the package says), then enjoy! If you do plan to cut the brownie, let it cool before you do so. I sliced the brownie into 9 pieces, which were easy to remove from the bowl.
Note: There was just enough brownie batter to cover the cookies. You may want to try mixing crushed cookies directly into the batter, or just using one layer of cookies. You can also use candy bars, chocolate chips, or nuts in place of (or in addition to) the cookies!
Marshmallow Treats
I actually first started to think about making sweet treats in my dorm because I wanted tosend some to my boyfriend. He'd left a couple of plastic food containers here (because he didn't have enough room to bring them back), and I thought it'd be great to send them back--with food inside. I wasn't going to tell him until the day he was supposed to receive the package, but he ended up receiving it a day earlier than I expected, so it was a true surprise! He loved it!
So,continuing with the stories of my food forays (see these cookie truffles!)... another sweet treat made with marshmallows and whatever crunchies you have on hand! Everybody's heard of Rice Krispies Treats, but, as a Pinterest search will show, there are so many variations!
Basically, to 3 tablespoons of butter (or vegetable oil, as I had and used) and a 10-ounce package of marshmallows (or a 7-ounce jar of marshmallow fluff), add 6 to 7 cups of crunch--Rice Krispies, other cereals, crushed cookies, crushed pretzels... You can also add stuff into the marshmallow (just stir it in after the marshmallows melt), like peanut butter or Nutella!
Here are some of the combos I've done:
3 tablespoons vegetable oil
10 oz. marshmallows
6 cups Frosted Flakes and crushed Oreos
(These turned out a little too sweet for my taste.)
3 tablespoons vegetable oil
7 oz. marshmallow fluff
1/2 cup peanut butter
6 1/2 cups crushed sourdough pretzels
These were delicious, but didn't hold together as well as I'd hoped. Although I did use 4 tablespoons of vegetable oil by accident... oops :)
Cookie Truffles
As the end of the semester draws to a close, I realize that I have way too many Dining Dollars. It's part of the meal plan here. So, because I want to get my money's worth of food, I needed to spend about $300 in two weeks. I bought lots of cookies and chips. But to be honest, I don't really want to eat most of it. My dorm floor has this table in the hall where people sometimes put treats to share--brownies from home, a bag of candies, whatever. So I thought... why not contribute to this table? Better yet, why not convert boring snacks into exciting treats? Since it's finals week, I have nothing to do except study. Which means I have plenty of time to make food!
After browsing Pinterest for a long time, I tried some of the ideas I saw, to great appreciation from my floor-mates. The next few posts will be about food I've made with a microwave and a fridge. And ingredients from the Quick Zone. These aren't necessarily quick... I'm just trying to use up ingredients :)
First up... truffles! Not the mushrooms, not the traditional chocolate kind (though there's plenty of chocolate in these), but the cookie kind! I've made three variations so far, and I have three more packages of cream cheese ready in the fridge. I'm planning on making lots more once I'm home to spread holiday cheer to friends!
The concept is pretty easy... Grab some cookies, crush 'em into crumbs, combine with cream cheese, form balls, and smother in chocolate. Since I have the pictures for my Nutella truffles, I'll go into detail with them.

After browsing Pinterest for a long time, I tried some of the ideas I saw, to great appreciation from my floor-mates. The next few posts will be about food I've made with a microwave and a fridge. And ingredients from the Quick Zone. These aren't necessarily quick... I'm just trying to use up ingredients :)
First up... truffles! Not the mushrooms, not the traditional chocolate kind (though there's plenty of chocolate in these), but the cookie kind! I've made three variations so far, and I have three more packages of cream cheese ready in the fridge. I'm planning on making lots more once I'm home to spread holiday cheer to friends!
 |
| Milk chocolate-covered Nutella truffles |
Ingredients:
8 oz, cream cheese (1 package)
13 oz. Nutella (1 of the small jars)
14.4 oz. graham crackers (a box of Honey Maid's, 27 crackers, about 4 cups when crushed finely)
About 8 oz. chocolate, any way you can get it* (see Step 6 below for more details)
Directions:
 |
| Graham cracker crumbs |
1. Crush graham crackers into crumbs.
I don't have a food processor, so I put the crackers in a gallon Ziploc bag, squeezed the air out, and used my hands. To go true college-style, use the spine of your least favorite textbook. It was quite a good way to de-stress before finals ;)
 |
| Truffle dough |
2. Add cream cheese and Nutella; mix until well combined.
I tried to use a bowl, then realized my cereal bowl wasn't going to cut it size-wise. So I poured everything back into the Ziploc bag and mushed it around. I've never tried using a bowl, so I can't say if using the baggie was easier, but it definitely wasn't hard--pretty simple, actually.
3. Place dough in refrigerator to harden.
Or the freezer, if you're impatient :)
 |
| Truffle balls |
4. Using a spoon, form compact balls of dough. (I ended up with about 45)
If you have some sort of round ice-cream scoop, that's fantastic. For the ones shown here, I used a spoon to compact the dough into the bottom of a tiny plastic cup. In my later truffles, I just used my hands to shape the dough into quasi-spherical shapes with the Ziploc bag, which was much less time-consuming, and the results were just as good.
5. Return to refrigerator (or freezer) to harden while you melt the chocolate.
6. Melt the chocolate!
Unwrap your chocolates and place them in a bowl, breaking the bars into smaller pieces. Set your microwave on half-power and microwave for short intervals, stirring in between. (I started off with 30, then decreased to 15 and 10-second intervals.) The idea is to go slowly because chocolate can burn easily if you're not careful. Also, make sure to keep water away from your chocolate so it doesn't form lumps. (If this happens, add a little vegetable oil and stir.)
*Because I didn't have enough of any one kind of chocolate, I separated the different kinds I had (though I didn't wash my bowl in between). I used Hershey's bars (milk and dark), Hershey's Kisses, Reese's peanut butter cups, M&M's, and York peppermint patties. Some reflections... I do not recommend York peppermint patties. Something about the mint (the sugar, maybe?) makes the chocolate gummy when it's melted and tough to chew when it re-hardens. For the M&M's, I crushed the candy shells with my spoon as I stirred the melted chocolate. The resulting coating still has the crunch, which I enjoyed. The Reese's cups coating was softer (even when cooled) than the chocolates because of the peanut butter, but I loved it just the same. The regular milk and dark chocolate turned out the way you'd expect.
7. Remove the truffle balls from the fridge and start dipping!
I dropped them in one at a time (my cereal bowl couldn't take much more anyway). Then, using a spoon and a fork, I rolled it around in the chocolate, then let it sit on the fork to let the excess chocolate drip off. Note: The coating is actually pretty thick. Depending on your preferences, you may want to add a tiny bit of vegetable oil to the chocolate while you melt it for a thinner coat. This makes it easier for the truffle's flavor to come through the chocolate (especially if you use peanut butter cups).
8. Place chocolate-dipped balls on waxed paper (or other nonstick surface), then into the fridge to set.
9. When the chocolate has cooled and hardened, enjoy!
 |
| After a bite...mmm! |
 |
| Dark chocolate coating on the left; Reese's coating on the right |
 |
| Dark chocolate- and M&M-coated truffles |
There are tons of variations on this--just check out Pinterest! I've also done the following:
11.5 oz. Keebler Fudge Stripes Cookies (1 small package) with 4 oz. cream cheese
11.75 oz. Chunky Chips Ahoy! cookies (1 package) with 4 oz. cream cheese
(Warning (or encouragement, if you needed more): These are very chocolatey!)
And am excited to try the following:
8 oz. ginger wafers with 4 oz. cream cheese
1 package Nilla wafers with 8 oz. cream cheese and 1/3 cup of mashed banana
Update 1/12/15: All the above variations are great! Also, try
16 oz. Nutter Butters with 8 oz. cream cheese
11 oz. Lorna Doone cookies in place of Nilla Wafers in the banana version above
Add candy chunks (KitKats, Crunch bars, Reese's) to the "dough" or form balls around candies like Whoppers or M&Ms
For a healthier option, substitute pudding for the cream cheese! I used 2 snack cups, or 7 ounces, but the dough was hard to shape. (However, I was impatient and only left the dough in the freezer for an hour or so.) I ended up spooning the dough directly into the chocolate, which worked. This results in a softer center that is delicious in its own right! I also want to try using Greek yogurt.
What are your guys' favorite combinations?
Wednesday, December 3, 2014
Brioche Infinity Scarf
Last night, I posted a picture of my brioche infinity scarf on Facebook, and it got a lot of positive feedback, so I thought I'd share the exact pattern. If you are familiar with brioche stitch, this is a quick and easy knit. If not, brioche is pretty repetitive and easy to pick up, so there's no better time to learn!

BRIOCHE INFINITY SCARF
*Note: You can seam or graft the ends together. I haven't found a good way to graft brioche, so either way, the join will be visible. If you wear the scarf with the join in the back, it's completely unnoticeable, so neither grafting or seaming is better than the other. (If you know of a way to graft brioche, let me know!)
Yarn: Red Heart Super Saver Solids, Cherry Red (1 skein)
Needles: US Size #11
Gauge: 15 sts x 7.5 rows = 4" x 4" in pattern (In brioche stitch, one "V" counts as one row and is formed by working back and forth, so one counted row is actually two rows worked back and forth.)
Finished dimensions: about 9" x 5'
Brioche Pattern:
Row 1 (WS): sl1wyib, k2tog, *sl1wyif, yo, k2tog. Rep from * to last st. k1.
Row 2: sl1wyib, *sl1wyif, yo, k2tog. Rep from * to last 2 sts. sl1wyif, yo, k1.
Scarf:
Cast on 29 sts loosely. Use a provisional cast-on if you plan to graft the two ends of the scarf together. (You can also seam the ends together.)
Row 1 (RS): sl1wyib. *sl1wyif, yo, k1. Rep from * to end of row.
Now work in Brioche Pattern until there is just enough yarn to graft or bind off and seam the two edges together. I ended up with about 5 feet of scarf.
Graft to the provisional cast on. Alternatively, bind off and seam to the cast-on edge.
Weave in ends.
This pattern is for personal use only. The finished item may not be sold for profit. Please acknowledge the author. Thank you!
Tuesday, December 2, 2014
Cooking in the Dorm
My first semester at college is nearly over. I can't believe it. Overall, I think I've adjusted well, but I miss home-cooked food. Oddly, I've developed a bit of an obsession for cooking now. Since I'm only allowed a refrigerator and a 600-watt microwave, I can't do much, but it forces me to become inventive. My family actually did not have a microwave for most of my childhood, so I'm still not completely comfortable with the do's and don't's of microwaving. However, endless Google searches and Pinterest-browing sessions have given me ideas with the limited ingredients I can buy with my meal plan, and I have yet to cause a mess. Yay!
(Side note: I just discovered Pinterest a couple of weeks ago. It is addicting.)
Anyway, I thought I'd share some things I've done with the microwave.
Fruits--Chop an apple or banana into a bowl, or just throw some berries in there and microwave. Add raisins if you can find them. Goes great with plain yogurt (though some may prefer added sweetness). If you microwave them for a bit longer, berries become jam-like when they cool. Careful: blueberries pop and splatter, so cover your bowl (I use damp paper towels).
Eggs--Scramble 'em up and pop them in on medium-high heat for about 2 minutes. Add some milk for added fluff. You can add any combination of vegetables (I get mine from the salad bar)--mushrooms, peppers, tomatoes, spinach, onions, etc. and make an omelette!
Salad--I like my vegetables cooked. Microwave a salad with a little water. Make sure to prick vegetables such as cherry tomatoes with a fork.
1 egg + 1 mashed banana--It's good. Just try it. Make sure to mash the banana very well. Microwave on medium-high heat for 2 to 3 minutes. Add some oats (about 1/4 cup) if desired. Or other fruits. Or some chocolate chips. Whatever you want!
This brownie made from hot chocolate mix. She has so many variations, if you have hot cocoa packets, you're bound to have the other ingredients on hand!
French toast--Scramble an egg, add some milk (optional), and add a couple slices of bread torn into chunks. Stir it around and make sure the bread soaks up the egg. Microwave on medium-high heat for about two minutes. Before tearing up the bread, you can make a sandwich (jelly, Nutella, peanut butter, etc.) to add some sweetness and flavor. You can also add fruits to the bowl before you microwave. I've also tried soaking a PB&J sandwich in milk, then microwaving it on the plate, which works, too! (But the plate's a pain to clean... grease liberally with vegetable oil.)
Here are some more time-consuming treats. That doesn't mean difficult, though--they're made with only a few ingredients--and they're well worth the wait!
Cookie truffles: cream cheese, cookie crumbs, chocolate candies (optional)
Marshmallow treats: marshmallows, vegetable oil, crunchy pieces
Slutty Brownie: Betty Crocker Warm Delights Hot Fudge Brownie, Chips Ahoy!, Oreos
Banana pudding sandwiches: banana, vanilla pudding, Nilla wafers (or Lorna Doone cookies)
Graham cracker cakes: graham crackers, pudding/cream cheese/Cool Whip/jelly/etc.
Saturday, November 29, 2014
Brioche Scarves
I discovered brioche stitch last year when I knit my dad a scarf for Christmas. I love its squishiness and warmth and drape! It's also a very neutral pattern that works for men and women--I feel like I can knit it in any color and style and it'll look great.
 Here's the scarf I knit for my dad last year. I knit it with Red Heart Super Saver on size 11 knitting needles. I love the extra squish the large needles give. If you use different colors for the edges, as I did in black here, note that one edge will have one more stitch than the other (because brioche needs to be worked over an odd number of stitches). Happily for me, it's not very noticeable.
About a year ago, I also bought a skein of Red Heart Super Saver in cherry red to use on myself. I wasn't sure what to make, though. Eventually, I decided I wanted to use up the whole skein on one project, and after some trial and error, my brioche infinity scarf was made. It is so warm, and the loose tension makes the knitting stretchy, which makes the scarf even more versatile. Just knit away until you're out of yarn, then seam or graft the two ends together. I actually used a provisional cast on so I could graft, but after spending a lot of time trying to figure out how to graft brioche, I ended up using the stockinette version of the Kitchener stitch, which is by no means invisible, but I wear the scarf with the graft in the back, anyway, so in the end, it doesn't matter too much.
This is my first infinity scarf (Brioche Infinity Scarf), and I'm finding lots of new and fun ways to wear one. I'm discovering why these scarves as so popular!

And my mom, after seeing that, wanted one, too, so I was working on this the past couple of days. (The matching shirt was completely unintentional.) She gets it when she comes visit me for my birthday in a few weeks :)

Check out Summer Shenanigans for more!
About a year ago, I also bought a skein of Red Heart Super Saver in cherry red to use on myself. I wasn't sure what to make, though. Eventually, I decided I wanted to use up the whole skein on one project, and after some trial and error, my brioche infinity scarf was made. It is so warm, and the loose tension makes the knitting stretchy, which makes the scarf even more versatile. Just knit away until you're out of yarn, then seam or graft the two ends together. I actually used a provisional cast on so I could graft, but after spending a lot of time trying to figure out how to graft brioche, I ended up using the stockinette version of the Kitchener stitch, which is by no means invisible, but I wear the scarf with the graft in the back, anyway, so in the end, it doesn't matter too much.
This is my first infinity scarf (Brioche Infinity Scarf), and I'm finding lots of new and fun ways to wear one. I'm discovering why these scarves as so popular!
Update 1/12/15: Also, two-color brioche is beautiful. I learned it here. This Christmas, I converted my boyfriend into a scarf-wearer with this. He wears it all the time!


And my mom, after seeing that, wanted one, too, so I was working on this the past couple of days. (The matching shirt was completely unintentional.) She gets it when she comes visit me for my birthday in a few weeks :)
Check out Summer Shenanigans for more!
Caring for Plants
I recently moved into my home for the next eight months, my college dorm room! Before I left, my friend considerately gifted me two plants: an African violet and a fairy castle cactus. He also linked me to care websites for both, and the detail of those websites pretty much convinced me that I was going to kill both the plants. Happily, though, both the violet and cactus are in great condition. (Or at least the cactus hasn't changed for the worse.)
Here's how I care for the African violet.

And the cactus:

Here's how I care for the African violet.
- Rotate a quarter-turn every two days
- Water from the bottom every four days (I basically let the pot sit in water for thirty minutes)
- Water from the top, carefully avoiding the leaves, every month or so
- When I'm not watering the plant, I fill the dish with water and set the pot on some rocks to increase the humidity around the plant. I used rocks that I had; gravel would probably work better.
And the cactus:
- Rotate a quarter-turn every two days.
- Water until the water drains from the bottom of the pot every twelve days.
Graduation Tassel Ornament
While browsing the web after graduation, I came across this great idea for making ornaments from your graduation tassel. After preserving my bouquet and rose, I just had to do this, too. I picked up the plastic ornament for $0.59 at Michaels during their Black Friday sale. I think I could have done with a smaller size, but no matter--I still love how this looks!
 To make your own ornament from a tassel...
1. Buy a clear ornament with a cap.
2. There should be two holes in the cap where the wire goes through; cut a slit between these holes.
3. Feed the tassel through the hole in the top of the ornament. You'll probably have to turn the year tag sideways to get it in.
4. Pull the loop of the tassel through the slit you cut in the cap and cap the ornament.
5. Knot the loop of the tassel on the wire loop of the ornament.
6. Hang and enjoy!
If you'd like, you can also decorate the ornament with markers or ribbon, or add some confetti inside the ball. Get creative!
Preserving a Rose
I can't believe my first semester of college is over in a couple weeks. It's gone so quickly! I just finished a couple things from graduation because I was waiting for the craft stores to stock one thing: ornaments! The clear kind (glass or plastic) you can open up and fill yourself. Even better, Black Friday weekend meant it was all on sale at Michaels.
A few months ago, I wrote a couple posts about preserving flowers and what I did with my graduation bouquet. I'd dried my rose from graduation, coated it with hairspray, and tucked it away on a shelf until I could get an ornament ball. I picked up a plastic one for $0.29 (make sure to get the ones that have halves that snap together), tucked the rose inside, and threaded a piece of maroon embroidery floss through the hole on top. And voila! My graduation rose is now a beautiful ornament!
This was a super-easy way of preserving the rose and its accompanying memories. This is also a great idea to preserve other special flowers from a bouquet, boutonniere, or your garden!

If you want to add some extra pizzazz, check out Home Depot's dried rose Christmas ornaments. They use spray paint, some moss, and baby's breath to make extra-festive ornaments. I wanted to preserve my rose as a way to remember graduation, though, so I left it like this. Reminds me a bit of the Beast's rose in Beauty and the Beast, actually--just a different container.

A few months ago, I wrote a couple posts about preserving flowers and what I did with my graduation bouquet. I'd dried my rose from graduation, coated it with hairspray, and tucked it away on a shelf until I could get an ornament ball. I picked up a plastic one for $0.29 (make sure to get the ones that have halves that snap together), tucked the rose inside, and threaded a piece of maroon embroidery floss through the hole on top. And voila! My graduation rose is now a beautiful ornament!
This was a super-easy way of preserving the rose and its accompanying memories. This is also a great idea to preserve other special flowers from a bouquet, boutonniere, or your garden!
If you want to add some extra pizzazz, check out Home Depot's dried rose Christmas ornaments. They use spray paint, some moss, and baby's breath to make extra-festive ornaments. I wanted to preserve my rose as a way to remember graduation, though, so I left it like this. Reminds me a bit of the Beast's rose in Beauty and the Beast, actually--just a different container.
Basketweave Blanket
 I've wanted to knit a blanket for a while; however, the amount of yarn I would need to purchase always put me off. Recently, there was a huge yarn sale near me at the Pittsburgh Center for Creative Reuse (a fabulous nonprofit), so of course I went. I bought six skeins of Red Heart Super Saver for nine dollars, but because of the number of skeins of each color I had, I agonized over patterns for a while. I knew I wanted something fairly simple that I could work on while reading. I remembered the basketweave stitch patterns I'd come across while looking for scarf ideas. I love the texture of basketweave in the pictures, so I decided to go with that. To solve the problem of different numbers of skeins of different colors, I decided to arrange blocks in a pattern. After trial knits and measuring yarn and lots of knots, I finalized my pattern and got started. Here's what I eventually came up with.
This is a pretty heavy blanket, and it's on the stiffer side. I love curling up underneath it on the sofa!
BASKETWEAVE BLANKET
Needles: US Size 9 Circular needles are ideal because they can hold more stitches and more weight, but this works on straight needles as well. You don't want to know how I know.
Yarn: Red Heart Super Saver
White, 4 skeins; Red Heart Super Saver Aran, 2 skeins; Red Heart Super Saver
Navy Blue, 2 skeins*
Finished Dimensions: 40.5" x 69.25"
Gauge: 16 stitches x 26 rows = 4" x 4" in Basketweave Pattern
Finished Dimensions: 40.5" x 69.25"
Gauge: 16 stitches x 26 rows = 4" x 4" in Basketweave Pattern
*Note: Because there are times you will need three separate balls of navy, I pre-cut three pieces of navy, each about 47 yards long, for the squares in the middle (see chart below). I actually made the blanket one skein (but I was pretty desperate for yarn by the end), so after I cut yarn for the three sections in the middle, I worked each side of the border with one end of the yarn.
Basketweave Pattern:
 |
| In love with this texture! |
Rows 1 (RS)-3: k32
Row 4, 6: k3, (p2, k6), p2, k3
Row 5: k2, p1, (k2, p6), k2, p1,
k2
Row 7: k32
Row 8, 10: k7, (p2, k6), p2, k7
Row 9: k2, p5, (k2, p6), k2, p5,
k2
Row 10: k32
Row 10: k32
Repeat rows 4 to 10 ten times.
Repeat rows 4 to 7.
Row 48: k32
Blanket:
Cast on 170 stitches in navy
blue.
Knit 7 rows in garter stitch.
Maintain a 5-stitch navy blue
border on both sides throughout.
Follow the colors shown below and use the
basketweave pattern for each square. When working across, pick up the new colored yarn under the old color to minimize sewing later. It also creates a neat stitch-like pattern on the wrong side.**
Knit 7 rows in navy blue in garter stitch.
Bind off and weave in ends.
32 sts
48
rows
|
||||||||
*Image note: For some reason, the navy blue perimeter is missing a chunk in the upper left. I'm not sure why this is happening, but it's there!

**Here's the wrong side of my blanket. In addition to the woven ends which I didn't cut (since it's for me and I don't really care :D ), you can see the two types of edges between the navy blue and white. The right edge is a result of the wrong side bumps, but the left edge is the result of picking up the new color from underneath the old color!

**Here's the wrong side of my blanket. In addition to the woven ends which I didn't cut (since it's for me and I don't really care :D ), you can see the two types of edges between the navy blue and white. The right edge is a result of the wrong side bumps, but the left edge is the result of picking up the new color from underneath the old color!
This pattern is for personal use only. The finished item may not be sold for profit. Please acknowledge the author. Thank you!
Thursday, September 18, 2014
Dried Graduation Bouquet
After three weeks, the flowers have dried! (See Preserving Flowers.) As I have not yet found ornament balls on sale (well, it is July), I am leaving the rose aside to work with later.
My bouquet from graduation dried nicely. Some of the sunflower petals fell off, so I glued them back. Also, gravity caused the petals on the bottom to dry upwards, which doesn't look terrible, I guess. The craspedia (the other yellow one) is a little brown on top. The originally pink carnations have darkened to a beautiful dark red. The volderfrieden delphinium (blue trumpet-shaped ones) and
statice (purple) look as if they are alive, but they feel papery. The rose, originally orange, has become light orange with a bit of red (it was already past its prime when I decided to dry it).
I transferred the bouquet from the laundry room into the garage, where I lightly coated it with aerosol hairspray. For the vase, I cut the top off an old deodorant bottle made of a milky plastic, then painted the inside with a layer of blue acrylic paint. Because the bottle wasn't tall enough, I glued a ring of paper around the top. To make it thicker, I folded it in half lengthwise. I also painted a layer of diluted glue on it, but I don't think it made much of a difference. Then I just stuck the flowers in (I left the stems rubber-banded) and retied the ribbon from the bouquet. I am very pleased with the way it turned out!
Saturday, July 19, 2014
Birds and Trees Hat
After seeing the panda hat I knit for my friend, my sister asked for a ski hat for Christmas. However, she was worried that it wouldn't be warm enough. I assured her I could knit with two strands held together as one, doubling thickness and warmth.
Then I found double knitting.
Basically, you work two pieces at once, and the stitches alternate between the front piece and the back piece. You cast on and bind off with both colors held together. If you're working flat, one stitch on each edge is also worked with both strands together. You carry both strands together to the front or back of the work, but only choose one to loop around the needle. The result is double-sided--the same pattern on each side with the colors inverted.
I knit looser with this technique than usual--just something to watch out for.
I searched for some designs, and came across this one from The Purl Bee. With a table in Microsoft Word, I changed the pattern a bit to incorporate some birds (my sister's favorite animal). Add some ear flaps and a pompom and it's done! I am very pleased with how the hat turned out. My sister thinks it's warm enough, too!
(Sadly, the addition of the pompom means my sister can't wear this the other way.)
Tuesday, June 24, 2014
Preserving Flowers
With high school graduation just past (yippee!), I have a beautiful bouquet from my mom in the kitchen. And the rose from school (confession: I broke its stem in a moment of happy hugging). It's not the first time I've received meaningful flowers, but it is the first time I decided to think about preserving them. Originally, I just wanted to press the rose. But roses are round, and I wasn't sure how that would go.
So to the Internet I turned... I found that a.) if I wanted to press the rose I should slice it in half, and b.) other expensive methods aside, I could hang it upside-down and wait for it to dry.
Well that's not difficult. Except the waiting part. Two to three weeks! Sigh...
After further research, I found that many types of flowers can be dried that way. Including the ones in my bouquet (sunflower, rose, volderfrieden delphinium, craspedia, statice, carnation--I looked most of these names up).
So now I have lots of flowers hanging upside-down in the laundry room. For the rose whose stem broke, I threaded a piece of craft wire through the remaining bit of the stem and hung it from that. For the rest, I rubber-banded the stems and threaded some ribbon through it.
So now as I wait for the lack of water to do its job, I'm thinking of ways to display these dried flowers. I plan to apply a light coat of hairspray to the dried flowers to keep them stronger. After that... For the single rose, I'm thinking about placing it in a clear plastic ball, like an ornament (except that the openings of those are way too small. Perhaps a snow globe?). For the bouquet, I'd like to display it as a bouquet. I'm thinking about making a vase for it, then retying the original ribbon around it. However, that just seems like a dust collector, and it'd be a pain to dust... this still requires some brainstorming.
I can't wait for everything to dry!
Junk Mail Journal
For the past couple years, our mailbox has been stuffed with mail from colleges. I used to love getting stuff in the mail--I still do--but the sheer amount of mail I have received from colleges put me off a little. As is my habit, I didn't trash any of it (I didn't read any of it, either). However, as the college application process started to wrap up, I realized I needed to do something with my three brown paper shopping bags stuffed full of mail. So, after much research, I decided to make journals. Here are my first few:

I basically followed Sea Lemon's YouTube videos, following the links from this one.
To start, I opened all the envelopes and removed all their contents. Then I sorted envelopes and papers by size. I set aside magazines, postcards, and double-sided pages.
To work with envelopes, I unglued and cut off the flaps before cutting the envelopes to size and folding them to make text blocks. Although I tried to make each book with only one size of paper, it wasn't always possible. To accommodate, you could cut the papers to the same size. I just ignored the different sizes. These journals will be for me to write in, anyway. The number of signatures varied from book to book (anywhere from six to fourteen so far). For the endpapers, I ripped sheets from magazines or other double-sided pages and cut them to size. I only used book headbands for my first one because the spine wasn't even and I wanted to hide that. I did not add a bookmark.
For the cover, I used postcards or the covers of booklets for the inside. For the bookcloth portion, I cut a piece of colored paper to size. Then I glued on logos, stamps, and addresses from the cut-off envelope flaps. Finally, I used a glue stick to glue a piece of white tissue paper over the whole thing. I treated the entire thing as the bookcloth. I like the effect of the tissue paper because it "washes out" the colors. Note that the tissue paper is very fragile and will likely tear unless every inch of it is glued down. I also ran out of tissue paper; I have been using a thick, clear, flexible plastic that some of the mail came in. It is harder to glue, but it gives the books a nice sheen. I also used a Chipotle bag for the covers of some books. I like papers that have text on them. You could also decorate with stickers or drawings.
I really enjoy making these books (twenty and still going). It's a great way to recycle paper, and because I'm a daily journal-writer, it's also very practical. (I just find white spaces to write.)
Now I just need to figure something out for the magazines, postcards, and double-sided sheets!
Subscribe to:
Posts (Atom)