Tuesday, August 16, 2016

Tutorial: Despicable Me Minion: Part 6: Finishing Touches

Mouth:
Yarn: Red Heart Super Saver Heather Gray

Each cell represents a stockinette stitch. Red stitches were made first, then the gray ones. Rounds are counted from the bottom end of the minion torso.


Friday, August 14, 2015

School Scarf, Harry Potter Style!

I had a sudden moment of inspiration a couple weeks ago for a new knitting project: a school scarf. I wanted something Harry Potter -esque--you know, with the stripes and maybe a logo. On a side note, there are so many variations of Harry Potter scarves online.

It was fate, then, that when I went to Michaels for some yarn, they had a varsity stripes set (scarf and hat) knitting pattern for free. I grabbed a skein of navy and one of gold, and headed home to design the perfect paw print (know where I go yet?).

Instagram @crafty_ccc
I used the same designing technique that I used for the birds and trees hat. I drew the design on a piece of paper, then drew a grid on top, basically making a chart. Then I open an Excel file, square up the cells, and fill the cells according to my hand-drawn chart. The hard part for me is deciding what to do with squares that are half and half. After that, it's trial and error. I knit a sample and tweak it until I have something I love. Make sure you knit the sample the way you intend to knit the real deal. For example, I stranded my samples, but then decided to use double knitting for the real thing. It ended up stretching the design so much horizontally that I had to start all over.

To design the scarf, I had to decide a few things how to deal with the color work and what pattern to use for the scarf. As I mentioned, I decided the use double knitting for the paw designs. I didn't have enough yarn to make the entire scarf in the round, and I didn't want messy stranding work to be visible. To start double knitting in sections, I added the second color (gold in this case) by holding it with the first color and treating them as one strand on a wrong side row. I made sure to pick up the strands under the other one when I got to the double knit sections. To end the double knit sections, I used p2tog on a wrong side row. I'm pretty happy with the results. For the scarf pattern, I used k2, p2 on the right side and purled the wrong side, resulting in ribbing that alternates stockinette with garter stitch. It's supposed to lie flat (I will depend upon the powers of blocking), and I think it makes a nice, neutral base for the stripes.

I'm really excited to be almost finished with this scarf!

Blocking

I just tried steam blocking for the first time and it was magical. I could see the seed-stitched edges of the scarf relax and flatten before my very eyes. I can't believe I waited so long to try it! My scarf now lies flat, and the design (Ravelry pattern here) is visible when worn. Did I mention how happy I was with the result?

I've only blocked once before. I used a 100% wool yarn for the first time (my rambling thoughts on Sheep(ish) from two years ago here), and since I thought wet blocking sounded pretty simple, I decided to try it out. There wasn't anything that I was really trying to shape, so I ended up just soaking the scarf in water and laying it out to dry. The end result didn't look any different from what I started with, and I decided that day that blocking wasn't as necessary as everyone made it out to be.

Here is an old picture of the scarf drying on a trash bag (unconventional, I know). Looking at it now, I really should have straightened out the ends and squared the whole thing up... but I guess it has its own charm this way, too.

Oops.

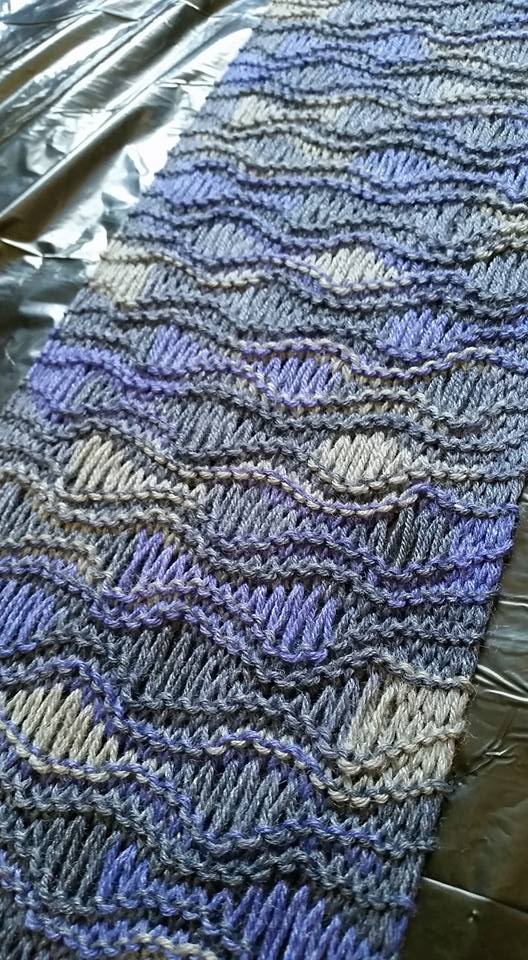
A few weeks ago, I knit a wave pattern that wasn't really visible unless you stretched the knitting out. So I knew I had to block it. I knit with Deborah Norville's Serenity Sock yarn, which is a blend of 50% merino wool, 25% bamboo, and 25% nylon. Since it was mostly wool, I decided to try wet blocking. That worked pretty well. Although the scarf shrank a bit when I unpinned it, the wave pattern is very visible now, and I managed to scallop the edges a bit.

Work in progress shot
Then, since I had nothing else to do that day and didn't feel like knitting right then, I decided to try steam blocking.

I finished a scarf three years ago (whoa I'm getting old) when I was getting back into knitting. After learning to purl and making a couple potholders, I decided to tackle a scarf with the beautiful teal Bernat Satin my sister had gotten me for Christmas. Unfortunately, she had only gotten me one skein, so the project was put on hold as I decided I wanted to finish the project, ran to all the craft stores in the area and found no teal Bernat Satin, and finally ordered it online. I was really happy with the scarf when it was done. My tension was even, the color was beautiful, and the pattern was fantastic. However, even though the stockinette-based pattern was bordered by seed stitch, the scarf curled inward on the side. I didn't mind the texture that you can see in the wip shot, but I had to carefully lay the scarf out so that the edges were visible. And no matter how hard I tried, the beautiful pattern I'd worked so hard on was never visible when the scarf was worn. What was the point? I knew that I should block it. The pattern called for it, every knitting site praised blocking. But this yarn is acrylic. Meaning I'd have to use the iron. The iron is barely used in our house. Nobody really needs it. I started using it a lot this past winter while I was working on my t-shirt quilt, though, so I felt more confident about using it.


So finally... the blocking. I brought out the ironing board and laid a towel on it. Then I laid out the scarf as neatly as I could, right side up. Which was a mistake--more on that later. Then I set up the iron and got started! I held the iron right above the surface of the knitting in sections, staying in each spot for about five seconds and moving over the entire scarf. For the edges, I peered under the iron and held it until the edge laid completely flat, about ten seconds. I loved watching the tight, wavy border relax. Blocking also helped my cast-on edge a lot, too--the corner was sticking up.

This (terrible) picture of the wrong side taken by my dying phone shows the dramatic difference blocking made for the scarf. I couldn't lay the whole thing out on the ironing board, so after I finished one half, I laid out the other half. I was worried I would mess something up by not waiting for it to dry, but it didn't seem to make a difference. The photo shows a section that is half blocked, half unblocked. Near the top of the scarf, the seed stitch edge opens out, while near the bottom, the edge curls inward. When I was done, the whole thing lay so flat.

After I was done blocking, I carefully gathered the scarf and lay it out on a trash bag to dry (I had to clear the ironing area). Again, the movement didn't seem to affect anything. 

Now, the reason I should have gone wrong side up: See those shiny areas in the picture? They're not that obvious (I hope). That's from the iron. It was leaking water from the sole plate for some reason, and though I tried to keep it off the scarf, it still got splashed. I'm not sure if the hot water actually killed the yarn, but its effects are definitely visible. Hopefully, I can fix the iron problem in the future (maybe manual steam instead of constant steam). So make sure your iron steams well!

I can't wait to block a bunch of other projects--another scarf from two or three years ago, the basketweave blanket, the new scarf I'm working on..

Wednesday, July 29, 2015

Summer Shenanigans: Food

Since I've been at home and my sister doesn't need lunch to bring to school the next  day, my mom has felt much more adventurous with her cooking. I've had so much fun helping her make some Taiwanese favorites that we haven't had since our trip last summer. Here is some of the delicious food we've made!

Cream-filled rolls

I haven't seen these before, anywhere, but my mom found the recipe in her five-inch recipe binder. Looks like she cut it out of a magazine almost twenty years ago. These rolls are bread-like and can be reheated to out-of-the-oven goodness in the toaster oven. The filling is supposed to be a cream made of margarine, sugar, flour, and evaporated milk; but ours ended up more as a powder (for all three times we tried the recipe). It made them a little harder to roll up, but they were delicious all the same. This is the result of our first go; you can see they're slightly overcooked. These took up a lot of time; the dough had to rise (and for some reason our yeast always takes forever) and the assembly of 36 to 48 rolls is no easy task. I had so much fun with these, though. We made a little assembly line--my mom rolled out the dough, I filled it and rolled it up. The most interesting part of this recipe was the mozzarella cheese in the dough! We also tried steaming some extra dough one time, and it was delicious.

Buns

After we made the rolls, there was a lot of powder left. It reminded me of the cream in Chinese custard buns, so we decided to make buns! We filled some with the leftover powder for dessert; the rest were filled with pork and chives from our garden. I learned how to wrap up a bun, and I have to say I'm pretty happy with the results. The only problem I had was that no matter what I did, there was always a small hole at the top that I'd have to pinch closed. These were delicious, and the work involved with kneading the dough was well worth it. They rivaled the taste, though certainly not the convenience, of their frozen counterparts in the States. However, I think the fresh buns sold from stands in Taiwan probably edged out ours.

Beef and Scallion Pan-Fried Cakes


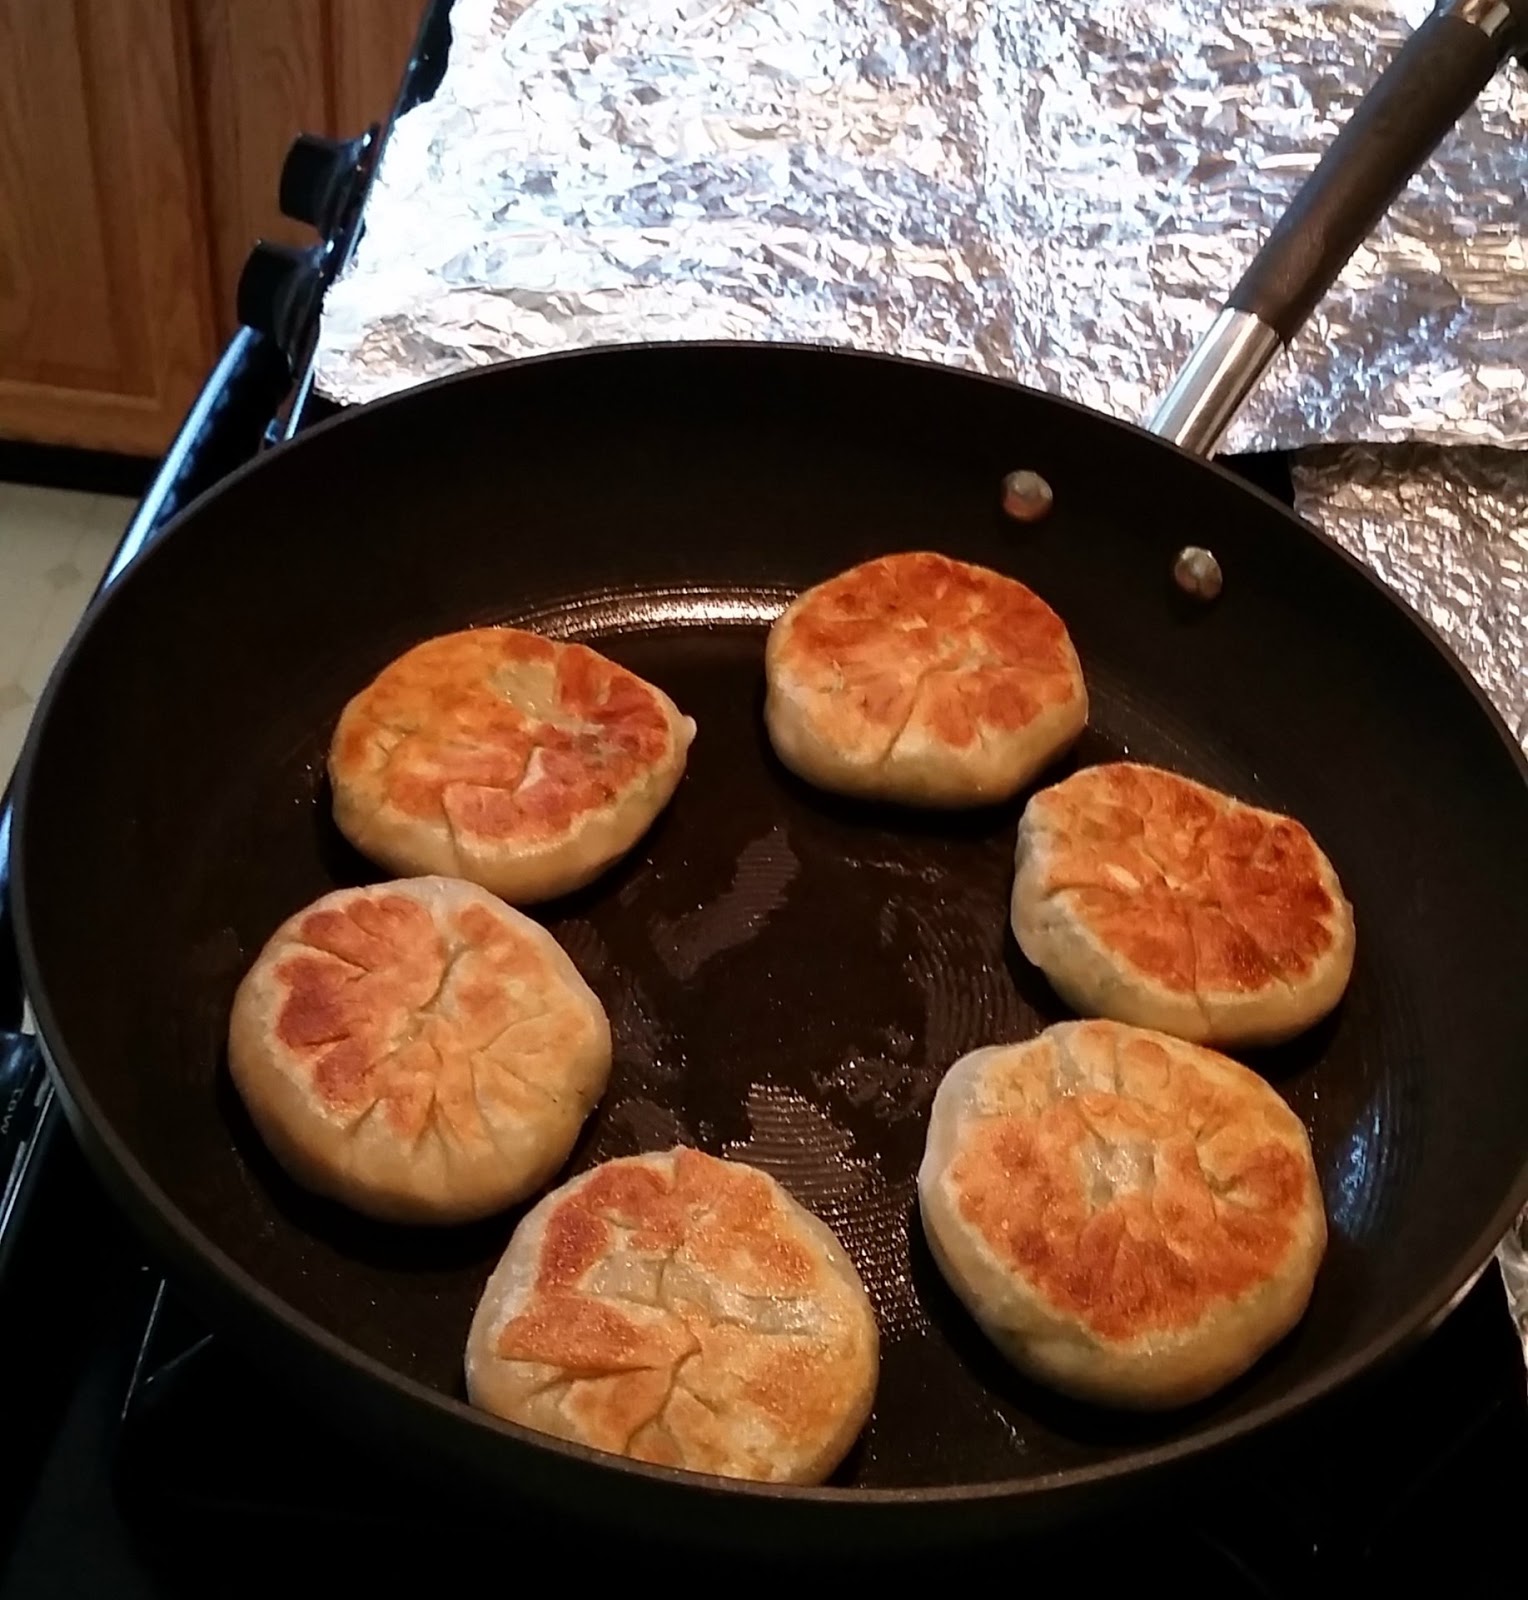
My, those pictures make me hungry. I've only had these pan-fried cakes in Taiwan, and let me tell you, those things are heaven. Ground beef infused with the fragrance of scallion is wrapped in a dough that's fried until crispy, then the whole thing is dunked in vinegar and soy sauce for a whole lot of delicious. The first time we made these we didn't have beef on hand, so we went with pork and Chinese chives from the garden. Chinese chives have flat blades and are a lot larger than the herb-like chives; they also have a much more pungent taste (like garlic and onions). My mom always planned our chive meals to be dinners after which none of us would go out. If something came up, we'd have to chew gum to get the smell out of our mouths. Neither my mom or I were very sure how to wrap these; I ended up doing a bun-like shape and then squashing the opening closed and down. Whatever works, right? Having these while States-side was a treat in and of itself, but our cake was a little tough. But when it was fresh out of the pan and crispy, there was nothing better. Downsides: burning my tongue on the delicious hot juice that had gathered inside.

Bubbles

You know, like in bubble tea? That's what I'm talking about here. Check out this post to see more pictures and for a brief recipe for this sweet and healthy (I think... I hope) treat.

Different kinds of sweet potato (and other starchy vegetables) provide endless combinations!


Vegetable "Snake"

This is a recipe from my grandmother. It's dough filled with a mixture of Chinese chives, egg, and tofu seasoned with soy sauce and sesame oil, then steamed. The name comes from the shape--the long, skinny rolls (apparently) resemble a snake. These are rather time-consuming because the egg and tofu need to be cooked first, chopped into tiny pieces, and cooled before the filling can be made. The assembly time doesn't take a ton of time because each roll is so large, but kneading and rolling out the dough is not something we do often.

Summer Shenanigans: Knitting


Summer is here! Summer is actually almost gone. Sad. I didn't touch my t-shirt quilt; it's still sitting in my closet. I guess the prospect of finding batting and fabric for the other side was too daunting. Instead, I made a lot of food and knit quite a bit, burning through a lot of my stash and turning most of it into brioche scarves and cowls. I hosted a photo shoot the other day to feature them... here are some of my favorites!

For more pictures, check out my Facebook page :)


Tuesday, July 28, 2015

地瓜圆: Sweet Potato "Bubbles"

Three kinds of sweet potato
 You know the chewy texture of the tapioca bubbles in bubble tea? In Chinese, it's described as "Q." I titled this post "Sweet Potato 'Bubbles'" because 地瓜圆 (di gua yuan) have that kind of texture. They also have all the sweet deliciousness of a sweet potato. They're made from three ingredients: sweet potatoes, tapioca flour, and water. Tapioca flour can be found in some supermarkets (I've seen it at ShopRite) and Asian supermarkets.

To make these delicious bubbles, cook, peel, and mash the sweet potatoes (microwave, oven, steam, your choice), then combine in a 10:3 ratio by weight with tapioca flour. Add a tablespoonful of boiling water, and use your hands to knead the mixture into a dough. Depending on the sweet potato, you may need to add more flour or more water. The dough should be pretty easy to mold.


For the following steps, I like to work on a cutting board protected with a piece of plastic wrap. Break off pieces of dough and roll them into cylinders that are about a half-inch in diameter. Use a knife to chop the cylinders into pieces about 3/4 of an inch long. (The size really doesn't matter).
Shaved ice with bubbles and mung bean

At this point, you can freeze your sweet potato bubbles. From room temperature or the freezer, the following cooking process is the same. Boil some water, then gently drop the bubbles into the water with a spoon, stirring to prevent them from sticking to the pot. Keep the water at a simmer and stir occasionally. When the bubbles float to the surface of the water, they should be ready. Taste one just to make sure--it shouldn't taste floury.

The bubbles can be eaten hot or cold--once cooked, they can cool to room temperature without getting mushy, but I wouldn't put them in the refrigerator. I like to eat these with hot water with brown sugar dissolved in it. These are also commonly found as a topping for Taiwanese shaved ice (baobing).


Taro bubbles
You're not limited to sweet potatoes for this recipe. Also note that sweet potatoes tend to need a lot more tapioca flour. Taro, a potato-like root vegetable that's featured in both savory dishes and desserts, is another common type of bubble. I've also tried pumpkin. There are so many possibilities--so get some tapioca flour and try this out!

Monday, January 12, 2015

T-Shirt Quilt Top Realized

This winter break was extremely productive. I didn't work or study. I sewed.

One of my first posts on this blog (and one of the reasons I started it) was because I had thoughts about a t-shirt quilt whirling around my mind. Well, this break, I worked on it. And I finished the quilt top.

TA-DAAAAA!

Considering that this was my first quilt since the week-long quilting summer camp I attended six years ago, it didn't go terribly. It didn't go great, either. But overall, I'm pleased with the results. The rest will have to wait for the next break.

I can't wait!

Peanut Butter Honey Rice Krispies Treats

As the first weekend of the spring semester rolled around, the weather outside was frightful. Below freezing. No way I was going to leave the building unless I had to. Instead, I made food. Lots of food. I made some cookie truffles--Oreo, Nutter Butter and KitKat and Crunch and Peanut M&M and Whopper, Lorna Doone and banana and vanilla pudding--to empty the food cabinet a bit. My floor devoured them.

I also made peanut butter honey bars to have on hand for breakfast when my roommate is asleep. Except I ate a quarter of the pan when they were done, snacked on them, and had them for breakfast even though she wasn't here. That's how delicious they were. Fortunately, I have enough to last me the three mornings I get up earlier than her this week. Unfortunately, I don't have any for next week, and I'm not going to be here over the holiday weekend so I can't make more.

I found a bunch of variations on Pinterest and molded them into this recipe. The honey taste was too strong for me, though, so I'm going to try increasing the peanut butter-to-honey ratio next time (and trust me, there will be a next time!). Here are some other versions (note that they all have different ratios of peanut butter and honey):

What I did, but with Trader Joe's O's
Made with oats
Or how about with Raisin Bran?


Here's what I ended up doing.

PEANUT BUTTER HONEY RICE KRISPIES TREATS

Ingredients:
½ cup peanut butter
½ cup honey
4 cups Rice Krispies cereal (or 3 cups of any other cereal or oats)


Directions:

1. Line a pan with foil or parchment paper, or spray it with cooking spray.

2. Combine peanut butter and honey in a microwave-safe bowl. (I used a 1/4-cup measure because my 1/2-cup is in my tub of oats, which is why there are two blobs of peanut butter.)
3. Microwave peanut butter and honey on HIGH for 1 minute; stir well.

4. Add cereal and stir well.


6. Press into the lined pan.

7. Cool, then cut into bars.


I've been eating these straight from the freezer, and I love the consistency. However, I'm pretty sure our freezer is a little less cold than most. According to the other posts I've read, these can get a little gooey at room temperature, but try and see what works for you!

I can't wait for breakfast tomorrow. Can you guess why? (Hint: I'm getting up earlier than my roomie.)


Friday, December 12, 2014

Graham Cracker Cakes

Finals are over! Whoooo! I celebrated by making a cake. In my dorm room. Which has no oven. That's right. Pinterest introduced me to the concept of graham cracker cakes, which actually don't even require the microwave. Basically, you alternate layers of graham crackers and pudding/cream cheese/Cool Whip. Then you put your "cake" in the refrigerator for 3 to 4 hours so the graham crackers soften. And then there you have it--a cake! It's actually delicious. I used chocolate pudding today, but anything goes! Jelly would probably taste good, too... I don't even know if this counts as cooking, but I'll label it as such anyway :)

Wednesday, December 10, 2014

Banana Pudding Sandwiches

Two finals down, two to go! I celebrated the halfway point by coming back from Final Number 2 and making food. Haven't looked at a textbook yet. I'll probably regret it later, but that's okay. Because I just made the most delicious snack yet (if I do say so myself)... banana pudding sandwiches! Super easy, and made from three ingredients found in Quick Zone: bananas, vanilla pudding, and Nilla wafers (or graham crackers). The microwave's not even necessary! (Though I did use it to bring out the banana flavor.) So here they are!


BANANA PUDDING SANDWICHES
Makes 40-50 sandwiches.

Ingredients:
1 medium ripe banana
3 vanilla pudding cups (like the Snack Pack kind)
1 box Nilla wafers (11 ounces, about 80 wafers)
(Feel free to adjust the banana-to-pudding ratio to your taste!)


Directions:
Banana pudding
1. Peel and chop the banana into a microwave-safe bowl.

2. Add the pudding.

3. Microwave on high for about 1 minute.
This step is optional, but I love how this brings out the banana flavor

4. Mash the banana chunks and stir well.

5. Place pudding in refrigerator or freezer for a few minutes to cool and set.


Making sandwiches

6. Lay out half of the Nilla wafers flat-side up, then dollop pudding onto each wafer.

7. Place a wafer flat-side down on top of the pudding to make sandwiches.

8. Place sandwiches in refrigerator or freezer for a few minutes to cool and set.

9. Serve right out of the fridge. Enjoy!

*I was just short of Nilla crackers, so I had to supplement with a couple graham crackers. Use whatever you have on hand! I think these would go great with Ritz, too...

My room is now filled with the heavenly smell of banana. Natural banana. Yum!

Improvements on Betty Crocker Warm Delights: Hot Fudge Brownie

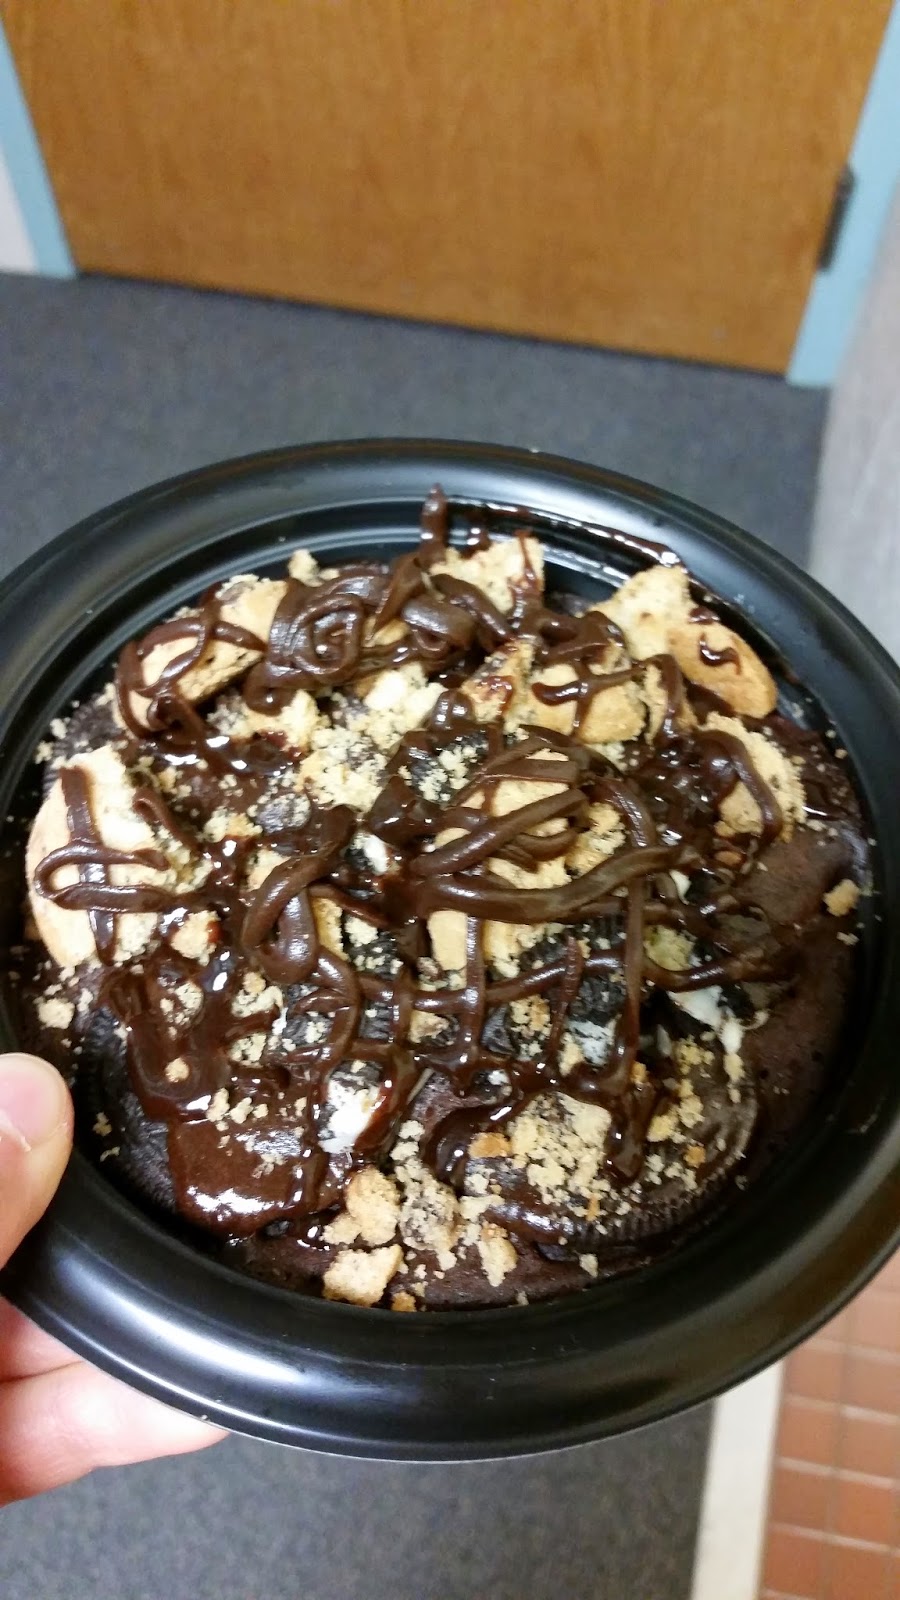
Weeks ago, in the Quick Zone, I came across a shelf of Betty Crocker Warm Delights bowls. Just for kicks, I bought a hot fudge brownie one. It sat in the cabinet until this afternoon, when I finally decided to do something with it. Because I was going to leave it in the hall for my floor-mates, I didn't want to just make the brownie, though. So this is what happened:

Betty Crocker Warm Delights--even better!

I was inspired by slutty brownies--you know, layer of cookie dough, layer of Oreos, layer of brownie batter, baked to perfection? Well I had mini Chips Ahoy!, Oreos, and brownie mix. So why not make slutty Warm Delights?

Here's what I did:

BETTY CROCKER WARM DELIGHTS: SLUTTY HOT FUDGE BROWNIE

Ingredients:
1 package Betty Crocker Warm Delights, Hot Fudge Brownie*
Water (for the brownie)
10 mini Chips Ahoy! (or any chocolate chip cookie... or any cookie, really...)
6 Oreos

Directions:
1. In a separate bowl, prepare brownie mix according to package directions. (Mix 1 tablespoon and 1 teaspoon of water with brownie mix.) Or you could use the bowl provided, if you're not too concerned with a chocolate chip cookie bottom :)

2. Place 7 Chips Ahoy! cookies in the bottom of the Warm Delights bowl.

3. Place 5 Oreos on top of the Chips Ahoy! cookies.

4. Pour brownie batter into bowl. Use a spoon to spread it around evenly and make sure it gets into the gaps between the cookies.

5. Cook brownie according to package directions (Microwave on high for about 45 seconds).

6. Remove brownie from microwave and top with remaining cookies, crushed, and hot fudge topping.

7. If you don't plan to cut the brownie, let it sit for 5 minutes (at least, that's what the package says), then enjoy! If you do plan to cut the brownie, let it cool before you do so. I sliced the brownie into 9 pieces, which were easy to remove from the bowl.


Note: There was just enough brownie batter to cover the cookies. You may want to try mixing crushed cookies directly into the batter, or just using one layer of cookies. You can also use candy bars, chocolate chips, or nuts in place of (or in addition to) the cookies! 

Marshmallow Treats

I actually first started to think about making sweet treats in my dorm because I wanted tosend some to my boyfriend.  He'd left a couple of plastic food containers here (because he didn't have enough room to bring them back), and I thought it'd be great to send them back--with food inside. I wasn't going to tell him until the day he was supposed to receive the package, but he ended up receiving it a day earlier than I expected, so it was a true surprise! He loved it!

So,continuing with the stories of my food forays (see these cookie truffles!)... another sweet treat made with marshmallows and whatever crunchies you have on hand! Everybody's heard of Rice Krispies Treats, but, as a Pinterest search will show, there are so many variations!

Basically, to 3 tablespoons of butter (or vegetable oil, as I had and used) and a 10-ounce package of marshmallows (or a 7-ounce jar of marshmallow fluff), add 6 to 7 cups of crunch--Rice Krispies, other cereals, crushed cookies, crushed pretzels... You can also add stuff into the marshmallow (just stir it in after the marshmallows melt), like peanut butter or Nutella!

Here are some of the combos I've done:
3 tablespoons vegetable oil
10 oz. marshmallows
6 cups Frosted Flakes and crushed Oreos
(These turned out a little too sweet for my taste.)

3 tablespoons vegetable oil
7 oz. marshmallow fluff
1/2 cup peanut butter
6 1/2 cups crushed sourdough pretzels
These were delicious, but didn't hold together as well as I'd hoped. Although I did use 4 tablespoons of vegetable oil by accident... oops :)

Cookie Truffles

As the end of the semester draws to a close, I realize that I have way too many Dining Dollars. It's part of the meal plan here. So, because I want to get my money's worth of food, I needed to spend about $300 in two weeks. I bought lots of cookies and chips. But to be honest, I don't really want to eat most of it. My dorm floor has this table in the hall where people sometimes put treats to share--brownies from home, a bag of candies, whatever. So I thought... why not contribute to this table? Better yet, why not convert boring snacks into exciting treats? Since it's finals week, I have nothing to do except study. Which means I have plenty of time to make food!

After browsing Pinterest for a long time, I tried some of the ideas I saw, to great appreciation from my floor-mates. The next few posts will be about food I've made with a microwave and a fridge. And ingredients from the Quick Zone. These aren't necessarily quick... I'm just trying to use up ingredients :)

First up... truffles! Not the mushrooms, not the traditional chocolate kind (though there's plenty of chocolate in these), but the cookie kind! I've made three variations so far, and I have three more packages of cream cheese ready in the fridge. I'm planning on making lots more once I'm home to spread holiday cheer to friends!

Milk chocolate-covered Nutella truffles
The concept is pretty easy... Grab some cookies, crush 'em into crumbs, combine with cream cheese, form balls, and smother in chocolate. Since I have the pictures for my Nutella truffles, I'll go into detail with them.

NUTELLA TRUFFLES
Adapted from these Quickie Nutella Truffles

Ingredients:
8 oz, cream cheese (1 package)
13 oz. Nutella (1 of the small jars)
14.4 oz. graham crackers (a box of Honey Maid's, 27 crackers, about 4 cups when crushed finely)
About 8 oz. chocolate, any way you can get it* (see Step 6 below for more details)


Directions:

Graham cracker crumbs
1. Crush graham crackers into crumbs. 

I don't have a food processor, so I put the crackers in a gallon Ziploc bag, squeezed the air out, and used my hands. To go true college-style, use the spine of your least favorite textbook. It was quite a good way to de-stress before finals ;)


Truffle dough
2. Add cream cheese and Nutella; mix until well combined. 

I tried to use a bowl, then realized my cereal bowl wasn't going to cut it size-wise. So I poured everything back into the Ziploc bag and mushed it around. I've never tried using a bowl, so I can't say if using the baggie was easier, but it definitely wasn't hard--pretty simple, actually. 

3. Place dough in refrigerator to harden. 

Or the freezer, if you're impatient :)


Truffle balls
4. Using a spoon, form compact balls of dough. (I ended up with about 45)

If you have some sort of round ice-cream scoop, that's fantastic. For the ones shown here, I used a spoon to compact the dough into the bottom of a tiny plastic cup. In my later truffles, I just used my hands to shape the dough into quasi-spherical shapes with the Ziploc bag, which was much less time-consuming, and the results were just as good.

5. Return to refrigerator (or freezer) to harden while you melt the chocolate.


6. Melt the chocolate! 

Unwrap your chocolates and place them in a bowl, breaking the bars into smaller pieces. Set your microwave on half-power and microwave for short intervals, stirring in between. (I started off with 30, then decreased to 15 and 10-second intervals.) The idea is to go slowly because chocolate can burn easily if you're not careful. Also, make sure to keep water away from your chocolate so it doesn't form lumps. (If this happens, add a little vegetable oil and stir.) 

*Because I didn't have enough of any one kind of chocolate, I separated the different kinds I had (though I didn't wash my bowl in between). I used Hershey's bars (milk and dark), Hershey's Kisses, Reese's peanut butter cups, M&M's, and York peppermint patties. Some reflections... I do not recommend York peppermint patties. Something about the mint (the sugar, maybe?) makes the chocolate gummy when it's melted and tough to chew when it re-hardens. For the M&M's, I crushed the candy shells with my spoon as I stirred the melted chocolate. The resulting coating still has the crunch, which I enjoyed. The Reese's cups coating was softer (even when cooled) than the chocolates because of the peanut butter, but I loved it just the same. The regular milk and dark chocolate turned out the way you'd expect.

7. Remove the truffle balls from the fridge and start dipping!

I dropped them in one at a time (my cereal bowl couldn't take much more anyway). Then, using a spoon and a fork, I rolled it around in the chocolate, then let it sit on the fork to let the excess chocolate drip off. Note: The coating is actually pretty thick. Depending on your preferences, you may want to add a tiny bit of vegetable oil to the chocolate while you melt it for a thinner coat. This makes it easier for the truffle's flavor to come through the chocolate (especially if you use peanut butter cups).

8. Place chocolate-dipped balls on waxed paper (or other nonstick surface), then into the fridge to set.

9. When the chocolate has cooled and hardened, enjoy!

After a bite...mmm!
Dark chocolate coating on the left; Reese's coating on the right
Dark chocolate- and M&M-coated truffles  
There are tons of variations on this--just check out Pinterest! I've also done the following:
11.5 oz. Keebler Fudge Stripes Cookies (1 small package) with 4 oz. cream cheese
11.75 oz. Chunky Chips Ahoy! cookies (1 package) with 4 oz. cream cheese
(Warning (or encouragement, if you needed more): These are very chocolatey!)

And am excited to try the following:
8 oz. ginger wafers with 4 oz. cream cheese
1 package Nilla wafers with 8 oz. cream cheese and 1/3 cup of mashed banana

Update 1/12/15: All the above variations are great! Also, try
16 oz. Nutter Butters with 8 oz. cream cheese
11 oz. Lorna Doone cookies in place of Nilla Wafers in the banana version above
Add candy chunks (KitKats, Crunch bars, Reese's) to the "dough" or form balls around candies like Whoppers or M&Ms
For a healthier option, substitute pudding for the cream cheese! I used 2 snack cups, or 7 ounces, but the dough was hard to shape. (However, I was impatient and only left the dough in the freezer for an hour or so.) I ended up spooning the dough directly into the chocolate, which worked. This results in a softer center that is delicious in its own right! I also want to try using Greek yogurt.

What are your guys' favorite combinations?

Wednesday, December 3, 2014

Brioche Infinity Scarf

Last night, I posted a picture of my brioche infinity scarf on Facebook, and it got a lot of positive feedback, so I thought I'd share the exact pattern. If you are familiar with brioche stitch, this is a quick and easy knit. If not, brioche is pretty repetitive and easy to pick up, so there's no better time to learn!


BRIOCHE INFINITY SCARF

*Note: You can seam or graft the ends together. I haven't found a good way to graft brioche, so either way, the join will be visible. If you wear the scarf with the join in the back, it's completely unnoticeable, so neither grafting or seaming is better than the other. (If you know of a way to graft brioche, let me know!)

Yarn: Red Heart Super Saver Solids, Cherry Red (1 skein)
Needles: US Size #11
Gauge: 15 sts x 7.5 rows = 4" x 4" in pattern (In brioche stitch, one "V" counts as one row and is formed by working back and forth, so one counted row is actually two rows worked back and forth.)

Finished dimensions: about 9" x 5'

Brioche Pattern:
Row 1 (WS): sl1wyib, k2tog, *sl1wyif, yo, k2tog. Rep from * to last st. k1.
Row 2: sl1wyib, *sl1wyif, yo, k2tog. Rep from * to last 2 sts. sl1wyif, yo, k1.

Scarf:
Cast on 29 sts loosely. Use a provisional cast-on if you plan to graft the two ends of the scarf together. (You can also seam the ends together.)
Row 1 (RS): sl1wyib. *sl1wyif, yo, k1. Rep from * to end of row.
Now work in Brioche Pattern until there is just enough yarn to graft or bind off and seam the two edges together. I ended up with about 5 feet of scarf.
Graft to the provisional cast on. Alternatively, bind off and seam to the cast-on edge.
Weave in ends.

This pattern is for personal use only. The finished item may not be sold for profit. Please acknowledge the author. Thank you!

Tuesday, December 2, 2014

Cooking in the Dorm

My first semester at college is nearly over. I can't believe it. Overall, I think I've adjusted well, but I miss home-cooked food. Oddly, I've developed a bit of an obsession for cooking now. Since I'm only allowed a refrigerator and a 600-watt microwave, I can't do much, but it forces me to become inventive. My family actually did not have a microwave for most of my childhood, so I'm still not completely comfortable with the do's and don't's of microwaving. However, endless Google searches and Pinterest-browing sessions have given me ideas with the limited ingredients I can buy with my meal plan, and I have yet to cause a mess. Yay!

(Side note: I just discovered Pinterest a couple of weeks ago. It is addicting.)

Anyway, I thought I'd share some things I've done with the microwave.

Fruits--Chop an apple or banana into a bowl, or just throw some berries in there and microwave. Add raisins if you can find them. Goes great with plain yogurt (though some may prefer added sweetness). If you microwave them for a bit longer, berries become jam-like when they cool. Careful: blueberries pop and splatter, so cover your bowl (I use damp paper towels).

Eggs--Scramble 'em up and pop them in on medium-high heat for about 2 minutes. Add some milk for added fluff. You can add any combination of vegetables (I get mine from the salad bar)--mushrooms, peppers, tomatoes, spinach, onions, etc. and make an omelette!

Salad--I like my vegetables cooked. Microwave a salad with a little water. Make sure to prick vegetables such as cherry tomatoes with a fork.

1 egg + 1 mashed banana--It's good. Just try it. Make sure to mash the banana very well. Microwave on medium-high heat for 2 to 3 minutes. Add some oats (about 1/4 cup) if desired. Or other fruits. Or some chocolate chips. Whatever you want!

This brownie made from hot chocolate mix. She has so many variations, if you have hot cocoa packets, you're bound to have the other ingredients on hand!

French toast--Scramble an egg, add some milk (optional), and add a couple slices of bread torn into chunks. Stir it around and make sure the bread soaks up the egg. Microwave on medium-high heat for about two minutes. Before tearing up the bread, you can make a sandwich (jelly, Nutella, peanut butter, etc.) to add some sweetness and flavor. You can also add fruits to the bowl before you microwave. I've also tried soaking a PB&J sandwich in milk, then microwaving it on the plate, which works, too! (But the plate's a pain to clean... grease liberally with vegetable oil.)

Here are some more time-consuming treats. That doesn't mean difficult, though--they're made with only a few ingredients--and they're well worth the wait!
Cookie truffles: cream cheese, cookie crumbs, chocolate candies (optional)
Marshmallow treats: marshmallows, vegetable oil, crunchy pieces
Slutty Brownie: Betty Crocker Warm Delights Hot Fudge Brownie, Chips Ahoy!, Oreos
Banana pudding sandwiches: banana, vanilla pudding, Nilla wafers (or Lorna Doone cookies)
Graham cracker cakes: graham crackers, pudding/cream cheese/Cool Whip/jelly/etc.


Saturday, November 29, 2014

Brioche Scarves

I discovered brioche stitch last year when I knit my dad a scarf for Christmas. I love its squishiness and warmth and drape! It's also a very neutral pattern that works for men and women--I feel like I can knit it in any color and style and it'll look great.

Here's the scarf I knit for my dad last year. I knit it with Red Heart Super Saver on size 11 knitting needles. I love the extra squish the large needles give. If you use different colors for the edges, as I did in black here, note that one edge will have one more stitch than the other (because brioche needs to be worked over an odd number of stitches). Happily for me, it's not very noticeable.

About a year ago, I also bought a skein of Red Heart Super Saver in cherry red to use on myself. I wasn't sure what to make, though. Eventually, I decided I wanted to use up the whole skein on one project, and after some trial and error, my brioche infinity scarf was made. It is so warm, and the loose tension makes the knitting stretchy, which makes the scarf even more versatile. Just knit away until you're out of yarn, then seam or graft the two ends together. I actually used a provisional cast on so I could graft, but after spending a lot of time trying to figure out how to graft brioche, I ended up using the stockinette version of the Kitchener stitch, which is by no means invisible, but I wear the scarf with the graft in the back, anyway, so in the end, it doesn't matter too much.

This is my first infinity scarf (Brioche Infinity Scarf), and I'm finding lots of new and fun ways to wear one. I'm discovering why these scarves as so popular!


Update 1/12/15: Also, two-color brioche is beautiful. I learned it here. This Christmas, I converted my boyfriend into a scarf-wearer with this. He wears it all the time! 


And my mom, after seeing that, wanted one, too, so I was working on this the past couple of days. (The matching shirt was completely unintentional.) She gets it when she comes visit me for my birthday in a few weeks :)


Check out Summer Shenanigans for more!

Caring for Plants

I recently moved into my home for the next eight months, my college dorm room! Before I left, my friend considerately gifted me two plants: an African violet and a fairy castle cactus. He also linked me to care websites for both, and the detail of those websites pretty much convinced me that I was going to kill both the plants. Happily, though, both the violet and cactus are in great condition. (Or at least the cactus hasn't changed for the worse.)

Here's how I care for the African violet.

  • Rotate a quarter-turn every two days
  • Water from the bottom every four days (I basically let the pot sit in water for thirty minutes)
  • Water from the top, carefully avoiding the leaves, every month or so
  • When I'm not watering the plant, I fill the dish with water and set the pot on some rocks to increase the humidity around the plant. I used rocks that I had; gravel would probably work better.
I also plucked off a leaf, cut its stem at a 45-degree angle (leaving about an inch of stem), and placed it in water. After a few weeks, roots started to grow. I moved the leaf into a pot of soil. It's been over a month, and I'm still waiting for something to sprout.

And the cactus:

  • Rotate a quarter-turn every two days.
  • Water until the water drains from the bottom of the pot every twelve days.
I've never really been much of a plant person, but I love how these add color to the room!

Graduation Tassel Ornament

While browsing the web after graduation, I came across this great idea for making ornaments from your graduation tassel. After preserving my bouquet and rose, I just had to do this, too. I picked up the plastic ornament for $0.59 at Michaels during their Black Friday sale. I think I could have done with a smaller size, but no matter--I still love how this looks!

To make your own ornament from a tassel...
1. Buy a clear ornament with a cap.
2. There should be two holes in the cap where the wire goes through; cut a slit between these holes.
3. Feed the tassel through the hole in the top of the ornament. You'll probably have to turn the year tag sideways to get it in.
4. Pull the loop of the tassel through the slit you cut in the cap and cap the ornament.
5. Knot the loop of the tassel on the wire loop of the ornament.
6. Hang and enjoy!

If you'd like, you can also decorate the ornament with markers or ribbon, or add some confetti inside the ball. Get creative!


Preserving a Rose

I can't believe my first semester of college is over in a couple weeks. It's gone so quickly! I just finished a couple things from graduation because I was waiting for the craft stores to stock one thing: ornaments! The clear kind (glass or plastic) you can open up and fill yourself. Even better, Black Friday weekend meant it was all on sale at Michaels.

A few months ago, I wrote a couple posts about preserving flowers and what I did with my graduation bouquet. I'd dried my rose from graduation, coated it with hairspray, and tucked it away on a shelf until I could get an ornament ball. I picked up a plastic one for $0.29 (make sure to get the ones that have halves that snap together), tucked the rose inside, and threaded a piece of maroon embroidery floss through the hole on top. And voila! My graduation rose is now a beautiful ornament!

This was a super-easy way of preserving the rose and its accompanying memories. This is also a great idea to preserve other special flowers from a bouquet, boutonniere, or your garden!


If you want to add some extra pizzazz, check out Home Depot's dried rose Christmas ornaments. They use spray paint, some moss, and baby's breath to make extra-festive ornaments. I wanted to preserve my rose as a way to remember graduation, though, so I left it like this. Reminds me a bit of the Beast's rose in Beauty and the Beast, actually--just a different container.

Basketweave Blanket

I've wanted to knit a blanket for a while; however, the amount of yarn I would need to purchase always put me off. Recently, there was a huge yarn sale near me at the Pittsburgh Center for Creative Reuse (a fabulous nonprofit), so of course I went. I bought six skeins of Red Heart Super Saver for nine dollars, but because of the number of skeins of each color I had, I agonized over patterns for a while. I knew I wanted something fairly simple that I could work on while reading. I remembered the basketweave stitch patterns I'd come across while looking for scarf ideas. I love the texture of basketweave in the pictures, so I decided to go with that. To solve the problem of different numbers of skeins of different colors, I decided to arrange blocks in a pattern. After trial knits and measuring yarn and lots of knots, I finalized my pattern and got started. Here's what I eventually came up with.

This is a pretty heavy blanket, and it's on the stiffer side. I love curling up underneath it on the sofa!


BASKETWEAVE BLANKET

Needles: US Size 9 Circular needles are ideal because they can hold more stitches and more weight, but this works on straight needles as well. You don't want to know how I know.
Yarn: Red Heart Super Saver White, 4 skeins; Red Heart Super Saver Aran, 2 skeins; Red Heart Super Saver Navy Blue, 2 skeins*
Finished Dimensions: 40.5" x 69.25"
Gauge: 16 stitches x 26 rows = 4" x 4" in Basketweave Pattern

*Note: Because there are times you will need three separate balls of navy, I pre-cut three pieces of navy, each about 47 yards long, for the squares in the middle (see chart below). I actually made the blanket one skein (but I was pretty desperate for yarn by the end), so after I cut yarn for the three sections in the middle, I worked each side of the border with one end of the yarn.

In love with this texture!
Basketweave Pattern:
Rows 1 (RS)-3: k32
Row 4, 6: k3, (p2, k6), p2, k3
Row 5: k2, p1, (k2, p6), k2, p1, k2
Row 7: k32                                                
Row 8, 10: k7, (p2, k6), p2, k7
Row 9: k2, p5, (k2, p6), k2, p5, k2
Row 10: k32
Repeat rows 4 to 10 ten times.
Repeat rows 4 to 7.
Row 48: k32

Blanket:
Cast on 170 stitches in navy blue.
Knit 7 rows in garter stitch.
Maintain a 5-stitch navy blue border on both sides throughout.
Follow the colors shown below and use the basketweave pattern for each square. When working across, pick up the new colored yarn under the old color to minimize sewing later. It also creates a neat stitch-like pattern on the wrong side.**
Knit 7 rows in navy blue in garter stitch.
Bind off and weave in ends.


32 sts

48 rows


*Image note: For some reason, the navy blue perimeter is missing a chunk in the upper left. I'm not sure why this is happening, but it's there!


**Here's the wrong side of my blanket. In addition to the woven ends which I didn't cut (since it's for me and I don't really care :D ), you can see the two types of edges between the navy blue and white. The right edge is a result of the wrong side bumps, but the left edge is the result of picking up the new color from underneath the old color!


This pattern is for personal use only. The finished item may not be sold for profit. Please acknowledge the author. Thank you!